Painted Christmas Suite - Pastel Christmas Season Card Tutorial
Bring the beauty of nature into your Christmas season with the Painted Christmas Suite. This mega-suite includes two stamp and die bundles, plus gorgeous, coordinating ribbon, Painted Christmas Designer Series Paper, and Gold Holly Leaves.
The Christmas Season Bundle (#156801) features two-step stamp images of pine cones, holly leaves, and other greenery in a soft watercolored look. The coordinating dies include many of the stamp images plus an assortment of labels perfect for adding greetings or creating Christmas gift tags.
The Christmas to Remember Bundle (#156806) is all about thoughtful holiday sentiments that feature mixed fonts and handwritten scripts. The coordinating die set is a unique, layered background image of pine branches, plus an assortment of coordinating pine cones. Each is great on their own, but even better together!
Pastel Christmas Season Card

INSTRUCTIONS
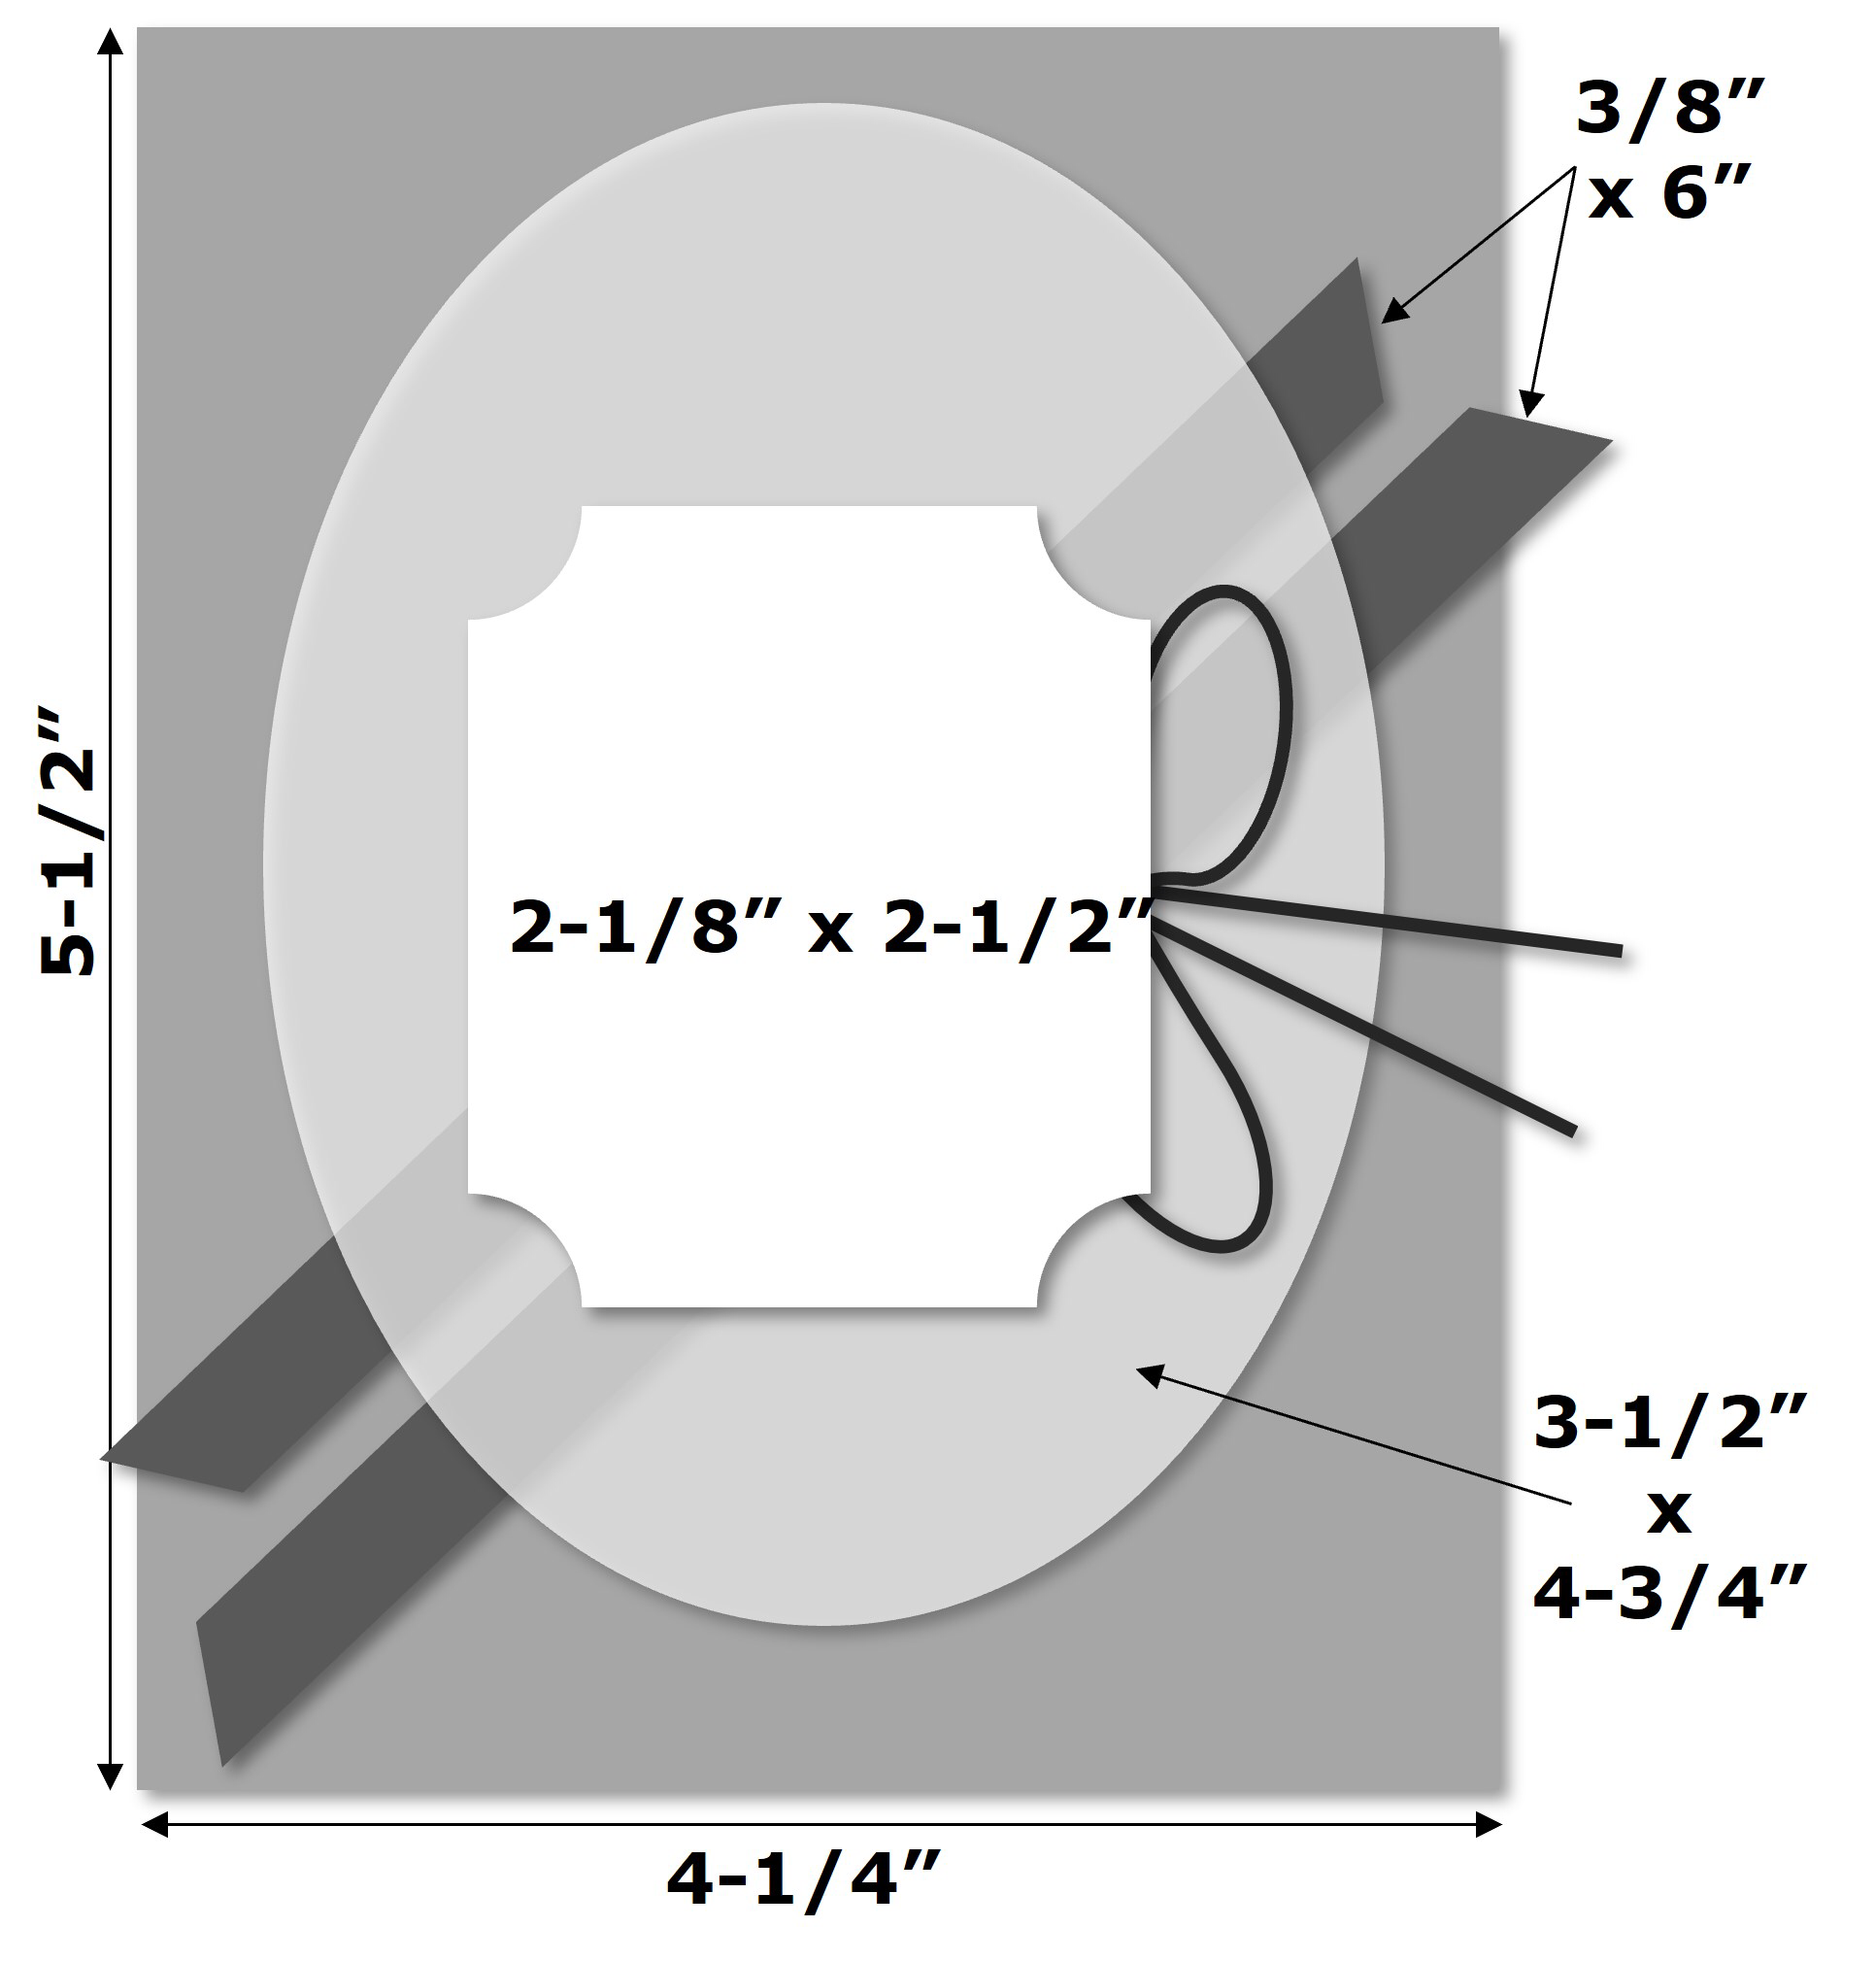
1) Score 5-1/2" x 8-1/2" Balmy Blue cardstock at 4-1/4" along the 8-1/2" side. Fold card and burnish with a Bone Folder to get a nice flat fold.
2) Place folded card on Silicone Craft Sheet or Grid Paper. Cover with striped Adorning Designs Decorative Mask. Hold mask in place with blue painter's tape or similar.
3) Use a Palette Knife to smooth Embossing Paste over masked card. Use a think layer and don't worry about making it perfect! Carefully remove mask while the paste is wet. Clean mask, tools, and Silicone Craft sheet with water before they dry. Set card aside to dry.
4) On scrap Basic White cardstock, stamp three of the larger leaf images with Cinamon Cider ink. Stamp one large and three small pine cones with Blushing Bride ink. Stamp two berry images and three pine branch images with Misty Moonlight ink. Stamp two smaller leaf images with Soft Succulent ink.
5) Die cut all images with coordinating dies.
6) Stamp greeting on Basic White cardstock with Misty Moonlight ink and die cut with label die.
7) Once card is dry, layer two 6" pieces of ribbon on the card front with Mini Glue Dots.
8) Layer die cut leaves, pine cones, berries, etc. to the card front using Mini Glue Dots and/or Stampin' Dimensionals.
9) Add a bow tied from Linen Thread to the right of center on the card front and layer the greeting slightly over it with Stampin' Dimensionals.
SUPPLIES
BUNDLES: #156801 - Christmas Season Bundle (#156293Christmas Season stamp set & #156299 Seasonal Labels Dies)
STAMPS: #156449 - Encircled in Warmth Stamp Set
PAPER :#159276 - Basic White, #146982 Balmy Blue
INK: #147100 - Blushing Bride, #153114 - Cinnamon Cider, #153118 - Misty Moonlight, #155778 - Soft Succulent
TOOLS: #156328 - Adorning Designs Decorative Masks, #142808 Palette Knives, #149653 Stampin' Cut & Emboss Machine or #150673 Mini Stampin' Cut & Emboss Machine, #127853 Silicone Craft Sheet (optional) or Grid Paper #130148
ADHESIVES: #103683 Mini Glue Dots, #104430 Stampin’ Dimensionals
EMBELLISHMENTS: #141979 Embossing Paste, #104199 Linen Thread, #156341 Blushing Bride 3/8'' (1 Cm) Frayed Grosgrain Ribbon
Non-Stampin' Up! Supplies: Blue Painter's Tape or similar for holding mask in place.
TIPS: When using Embossing Paste, don't worry about perfection. Having varying depths and textures adds to the overall effect. Clean up tools right after using, as the paste dries quickly, and is much easier to clean off the masks and tools while wet. Clean masks and tools with tepid running water and mild liquid dish soap. A soft damp cloth can also be used, but be careful not to bend edges of detailed mask images.
Coordinating Products
")
")
")

")


 Metallic Ribbon")
TAKE ME BACK TO THE TOP
Current Host Code
CLICK TO SHOP WITH HC

Free Newsletter!

Paper Pumpkin
SIGN ME UP!

Share With Friends
Most Recent Blog Posts
- FREE SHIPPING - DEC 14
- FREE SHIPPING from Oct 9th to 11th
- Stamp another Stack of Christmas Cards with Kevin & Christine
- Let the fun begin - again …
- Why wait? Join us now!
- Fitting Florets for any Occasion
- Festive Window Wishes
- Starter Kit + = No brainer!
- Perched in a Tree
- Awash in Beauty, so gorgeous!

.jpg)
.jpg)
.jpg)
.jpg)
.jpg)
.jpg)
.jpg)
.jpg)
.jpg)
.jpg)
.jpg)
.jpg)
.jpg)
.jpg)
.jpg)
.jpg)
.jpg)
.jpg)
.jpg)
.jpg)
.jpg)
.jpg)
.jpg)
.jpg)
.jpg)
.jpg)
.jpg)
.jpg)
.jpg)
.jpg)
.jpg)
.jpg)
.jpg)
.jpg)
.jpg)
.jpg)
.jpg)
.jpg)
.jpg)
.jpg)
.jpg)
.jpg)
.jpg)
.jpg)
.jpg)
.jpg)
.jpg)
.jpg)
.jpg)
.jpg)
.jpg)
.jpg)
.jpg)
.jpg)
.jpg)
.jpg)
.jpg)
.jpg)
.jpg)
.jpg)
.jpg)
.jpg)
.jpg)
.jpg)
.jpg)
.jpg)
.jpg)
.jpg)
.jpg)
.jpg)
.jpg)
.jpg)
.jpg)
.jpg)
.jpg)
.jpg)
.jpg)
.jpg)
.jpg)
.jpg)
.jpg)
.jpg)
.jpg)
.jpg)
.jpg)
.jpg)
.jpg)
.jpg)
.jpg)
.jpg)
.jpg)
.jpg)
.jpg)
.jpg)
.jpg)
.jpg)
.jpg)
.jpg)
.jpg)
.jpg)
.jpg)
.jpg)
.jpg)
.jpg)
.jpg)
.jpg)
.jpg)
.jpg)
.jpg)
.jpg)
.jpg)
.jpg)
.jpg)
.jpg)
.jpg)
.jpg)
.jpg)
.jpg)
.jpg)
.jpg)
.jpg)
.jpg)
.jpg)
.jpg)
.jpg)
.jpg)
.jpg)
.jpg)
.jpg)
.jpg)
.jpg)
.jpg)
.jpg)
.jpg)
.jpg)
.jpg)
.jpg)
.jpg)
.jpg)
.jpg)
.jpg)
.jpg)
.jpg)
.jpg)
.jpg)
.jpg)
.jpg)
.jpg)
.jpg)
.jpg)
.jpg)
.jpg)
.jpg)
.jpg)
.jpg)
.jpg)
.jpg)
.jpg)
.jpg)
.jpg)
.jpg)
.jpg)
.jpg)
.jpg)
.jpg)
.jpg)
.jpg)
.jpg)
.jpg)
.jpg)
.jpg)
.jpg)
.jpg)
.jpg)
.jpg)
.jpg)
.jpg)
.jpg)
.jpg)
.jpg)
.jpg)
.jpg)
.jpg)
.jpg)
.jpg)
.jpg)
.jpg)
.jpg)
.jpg)
.jpg)
.jpg)
.jpg)
.jpg)
.jpg)
.jpg)
.jpg)
.jpg)
.jpg)
.jpg)
.jpg)
.jpg)
.jpg)
.jpg)
.jpg)
.jpg)
.jpg)
.jpg)