Ice Cream Corner Ombre Card - FREE Tutorial

The tutorial below features the Ice Cream Corner Suite combined with an Ombre background, sweet details, and scrumptious colours. This cool card will melt hearts, but won't melt in the mail!
Ice Cream Corner Ombre Card Instructions
INSTRUCTIONS:
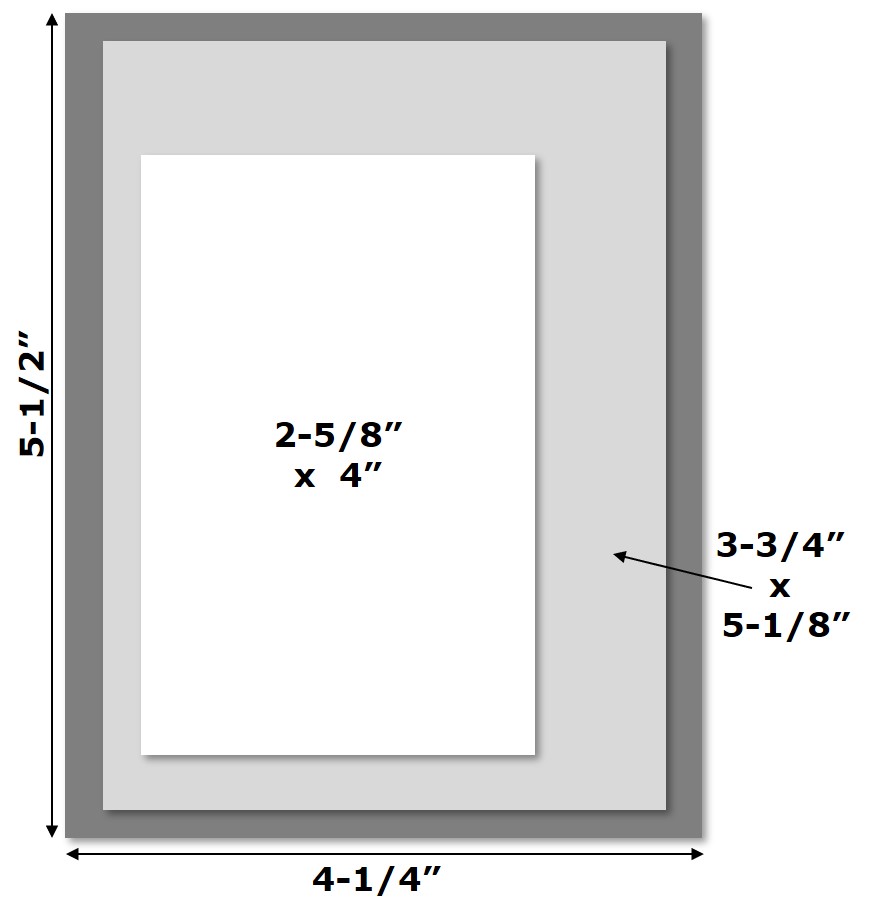
1) Cut Pool Party cardstock to 8-1/2" x 5-1/2". Score at 4-1/4" along the 8-1/2" side. Fold on scored line and use a Bone Folder to burnish the fold flat.
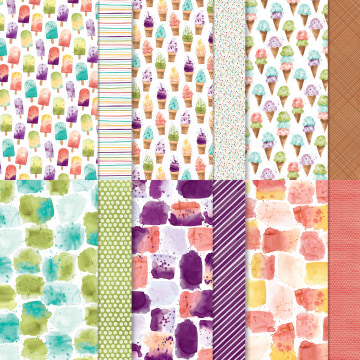
2) The Ice Cream Corner Designer Series Paper has three patterns that are multi-coloured watercolor splotches. Punch one of each colour using the scoop part of the Ice Cream Cone Builder Punch. Punch the waffle patterned paper once with the cone part of the punch.
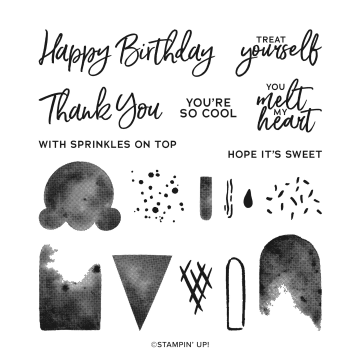
3) Stamp the sprinkle image on each ice cream scoop with the coordinating colour ink: Blackberry Bliss, Terracotta Tile, or Bermuda Bay.
4) Using the Stitched Rectangles dies, die cut the striped Ice Cream Corner Designer Series Paper with the die that measures about 3-3/4" x 5-1/8". Cut Basic White cardstock with the die that measures about 2-5/8" x 4".
5) Stamp the circular splatter design on the center left portion of the Basic White die cut rectangle with Pool Party ink. Stamp the "TREAT yourself" image at the bottom right corner with Blackberry Bliss ink. Stamp the whole greeting, you'll be covering up the "yourself" part later.
6) Build a triple scoop ice cream cone on the left side of the rectangle layer using Stampin' Dimensionals to adhere the ice cream cone and scoops.
7) Use the new Blending Brushes to create an Ombre background on the striped paper with Pool Party ink. You can pick up ink directly from the ink pad or use ink refill. Place your striped paper on Grid Paper or a protected surface. Ink the Blending Brush by rubbing it across the ink pad (or ink refill), starting off the edge of the striped paper and then working onto the paper swirl the Blending Brush in circles from the top edge down towards the center. Reink the Blending Brush and repeat. Concentrate more ink at the top and fade it towards the center.
8) Repeat the same steps to create an Ombre effect with Pool Party ink on a scrap of Basic White cardstock that is at least 4" x 2". Let the ink dry completely.
9) Stamp the "TREAT yourself" image on the Basic White Ombre paper with VersaMark ink. Cover generously with White Stampin Emboss Powder. Tap off excess powder and heat emboss with the Heat Tool.
10) Once cool use Paper Snips to cut around "yourself" leaving a border around the word. Adhere the cut out word over the Blackberry Bliss stamped word with Stampin' Seal or Multipurpose Liquid Glue.
11) Adhere the striped Ombre paper to the card front with Stampin' SEAL or Stampin' Dimensionals. Layer the Basic White rectangle onto the card front, offset to the left, with Stampin' Dimensionals.
SUPPLIES USED
STAMPS: Sweet Ice Cream Photopolymer stamp set (#154456)
PAPER: Pool Party (#122924), Thick Basic White (#159229), Ice Cream Corner Designer Series Paper (#154567)
INK: Blackberry Bliss Pad (#147092), Terracotta Tile (#150086), Bermuda Bay (#147096), Pool Party (#147107), VersaMark Pad (#102283)
ADHESIVES: Stampin’ Dimensionals (#104430), Multipurpose Liquid Glue (#110755), Stampin' SEAL (#152813)
TOOLS: Paper Snips (#103579), Rectangle Stitched Dies (#151820), Blending Brushes (#153611), Ice Cream Cone Builder Punch (#154241), Heat Tool (#129053)
EMBELLISHMENTS: White Stampin’ Emboss Powder (#109132)
Check out Coordinating Products


And one more idea:

TAKE ME BACK TO THE TOP
Current Host Code
PKTURGTS
CLICK TO SHOP WITH HC
See here how to use a Host CodeCLICK TO SHOP WITH HC


Free Newsletter!

Paper Pumpkin
SIGN ME UP!

Share With Friends
Most Recent Blog Posts
- FREE SHIPPING - DEC 14
- FREE SHIPPING from Oct 9th to 11th
- Stamp another Stack of Christmas Cards with Kevin & Christine
- Let the fun begin - again …
- Why wait? Join us now!
- Fitting Florets for any Occasion
- Festive Window Wishes
- Starter Kit + = No brainer!
- Perched in a Tree
- Awash in Beauty, so gorgeous!

.jpg)
.jpg)
.jpg)
.jpg)
.jpg)
.jpg)
.jpg)
.jpg)
.jpg)
.jpg)
.jpg)
.jpg)
.jpg)
.jpg)
.jpg)
.jpg)
.jpg)
.jpg)
.jpg)
.jpg)
.jpg)
.jpg)
.jpg)
.jpg)
.jpg)
.jpg)
.jpg)
.jpg)
.jpg)
.jpg)
.jpg)
.jpg)
.jpg)
.jpg)
.jpg)
.jpg)
.jpg)
.jpg)
.jpg)
.jpg)
.jpg)
.jpg)
.jpg)
.jpg)
.jpg)
.jpg)
.jpg)
.jpg)
.jpg)
.jpg)
.jpg)
.jpg)
.jpg)
.jpg)
.jpg)
.jpg)
.jpg)
.jpg)
.jpg)
.jpg)
.jpg)
.jpg)
.jpg)
.jpg)
.jpg)
.jpg)
.jpg)
.jpg)
.jpg)
.jpg)
.jpg)
.jpg)
.jpg)
.jpg)
.jpg)
.jpg)
.jpg)
.jpg)
.jpg)
.jpg)
.jpg)
.jpg)
.jpg)
.jpg)
.jpg)
.jpg)
.jpg)
.jpg)
.jpg)
.jpg)
.jpg)
.jpg)
.jpg)
.jpg)
.jpg)
.jpg)
.jpg)
.jpg)
.jpg)
.jpg)
.jpg)
.jpg)
.jpg)
.jpg)
.jpg)
.jpg)
.jpg)
.jpg)
.jpg)
.jpg)
.jpg)
.jpg)
.jpg)
.jpg)
.jpg)
.jpg)
.jpg)
.jpg)
.jpg)
.jpg)
.jpg)
.jpg)
.jpg)
.jpg)
.jpg)
.jpg)
.jpg)
.jpg)
.jpg)
.jpg)
.jpg)
.jpg)
.jpg)
.jpg)
.jpg)
.jpg)
.jpg)
.jpg)
.jpg)
.jpg)
.jpg)
.jpg)
.jpg)
.jpg)
.jpg)
.jpg)
.jpg)
.jpg)
.jpg)
.jpg)
.jpg)
.jpg)
.jpg)
.jpg)
.jpg)
.jpg)
.jpg)
.jpg)
.jpg)
.jpg)
.jpg)
.jpg)
.jpg)
.jpg)
.jpg)
.jpg)
.jpg)
.jpg)
.jpg)
.jpg)
.jpg)
.jpg)
.jpg)
.jpg)
.jpg)
.jpg)
.jpg)
.jpg)
.jpg)
.jpg)
.jpg)
.jpg)
.jpg)
.jpg)
.jpg)
.jpg)
.jpg)
.jpg)
.jpg)
.jpg)
.jpg)
.jpg)
.jpg)
.jpg)
.jpg)
.jpg)
.jpg)
.jpg)
.jpg)
.jpg)
.jpg)
.jpg)
.jpg)
.jpg)
.jpg)
.jpg)
.jpg)