Fine Art Product Suite and FREE Tutorial
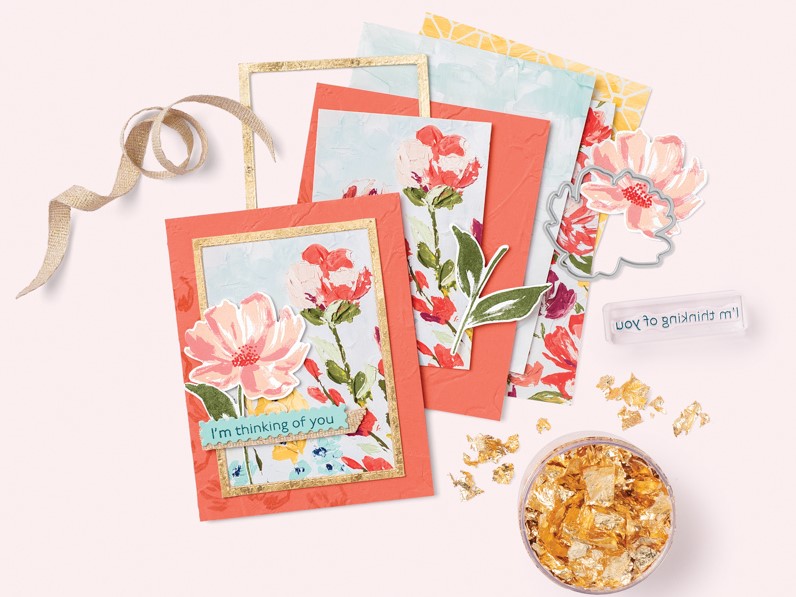
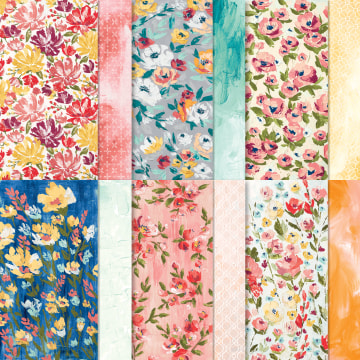
Fine Art Floral Suite
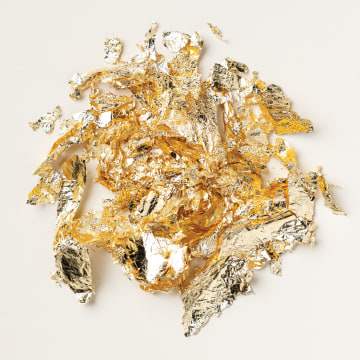
Let your inner artist loose with fun stamping techniques! The Fine Art Floral suite is the perfect combination of whimsical watercolor floral and glamorous gold accents. You will love all the ways you can use the Gilded Leafing Embellishments to create a unique effect much different from gold heat embossing or gold foil sheets.
This card I am showing you combines stamping on Designer Series Paper with the Gilded Leafing Embellishment to create a colourful card with rich texture and a touch of gold glam.
Be happy, create and stamp a little ....

--------------------------------------------------
Let's make this card:
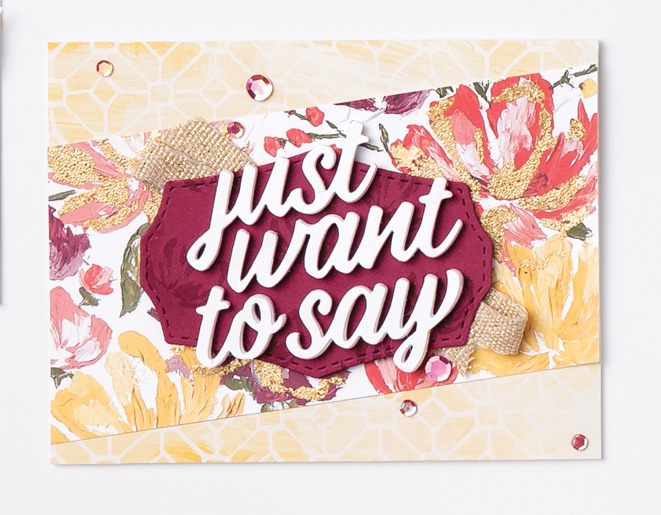
Gilded Fine Art Floral Card |
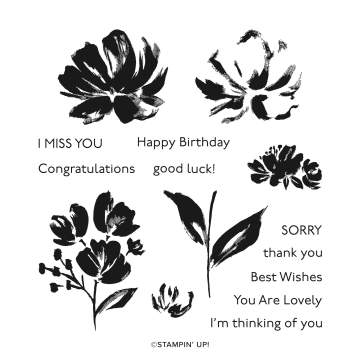
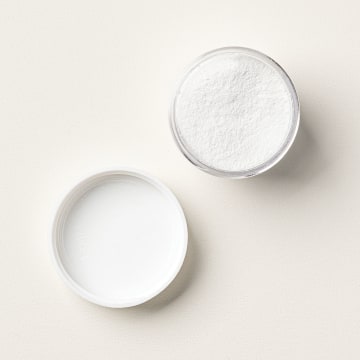
| INSTRUCTIONS: 1) Cut Basic White cardstock to 5-1/2" x 8-1/2" and score at 4-1/4" along the 8-1/2" side to create the card body. 2) Adhere a 5-1/2" x 4-1/4" piece of the Bumblebee and So Saffron patterned Fine Art Floral Designer Series Paper to the card front. 3) Cut a 3" x 6" piece of the multi-color floral design of the Fine Art Floral paper. 4) The Art Gallery stamp set is a Two-Step stamp set. The large floral bloom has two images the step-one image has more area while the step-two image has just the highlight areas. Use the step-two image to stamp on the coordinating flowers on the Fine Art Floral Paper with VersaMark ink. Cover Generously with Heat & Stick Powder. Pour off excess powder. Heat with Heat Tool, just until the powder is melted. It will be sticky. 5) Add Gilded Leafing Embellishment to the sticky areas and use your finger, Stamping Sponge or Blending Brush to gently rub off the excess Gilded Leafing. Return excess to your container. 6) Adhere paper strip to your card front at a diagonal. Trim off excess at the edge of the card with Paper Snips. 7) Use Glue Dots or Stampin' SEAL+ to add a zig-zag of Fine Art Ribbon to the center of the card. 8) Die cut scrap Merry Merlot cardstock with the label die from the . Stamp the label randomly with the small flower image using Merry Merlot ink. Add to center of card, over the ribbon with Stampin' Dimensionals. 9) Cut 3" x 3" pieces of Basic White cardstock and Foam Adhesive sheets. Peel the backing off of one side of the adhesive sheet and adhere the cardstock. Set up your Stampin' Cut & Emboss machine with the sandwich for a thin die. Unlike you normally would, set the "just want to say" die from the Art Gallery stamp set is a Two-Step stamp set. The large floral bloom has two images the step-one image has more area while the step-two image has just the highlight areas. Use the step-two image to stamp on the coordinating flowers on the Fine Art Floral Paper with VersaMark ink. Cover Generously with Heat & Stick Powder. Pour off excess powder. Heat with Heat Tool, just until the powder is melted. It will be sticky. 5) Add Gilded Leafing Embellishment to the sticky areas and use your finger, Stamping Sponge or Blending Brush to gently rub off the excess Gilded Leafing. Return excess to your container. 6) Adhere paper strip to your card front at a diagonal. Trim off excess at the edge of the card with Paper Snips. 7) Use Glue Dots or Stampin' SEAL+ to add a zig-zag of Fine Art Ribbon to the center of the card. 8) Die cut scrap Merry Merlot cardstock with the label die from the . Stamp the label randomly with the small flower image using Merry Merlot ink. Add to center of card, over the ribbon with Stampin' Dimensionals. 9) Cut 3" x 3" pieces of Basic White cardstock and Foam Adhesive sheets. Peel the backing off of one side of the adhesive sheet and adhere the cardstock. Set up your Stampin' Cut & Emboss machine with the sandwich for a thin die. Unlike you normally would, set the "just want to say" die from the Floral Gallery Dies with the cutting side face up. Place the cardstock face down on the die with the foam adhesive at the top of the stack. Add the top cutting plate and run through the machine a couple times. If the backing sheet is cut through you are done, if it hasn't you may need to add a piece of cardstock as a shim and run it again. Once you see the backing sheet cut through you are done cutting. Peel away the excess cardstock from around the die. Leave the words inside the die while you remove the cut outs from inside the letters and the backing paper. 10) Press the die to the label on the card front where you want your greeting placed and gently pull the die away from the layered cardstock and foam adhesive. 11) Add about 6-7 Artistry Blooms Adhesive-Backed Sequins in several sizes to finish the card. |
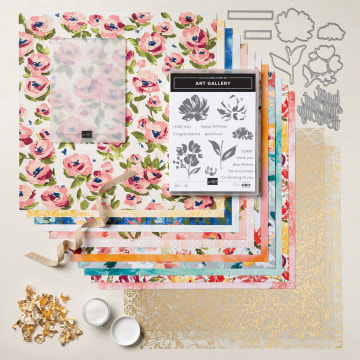
SUPPLIES:
STAMPS: BUNDLES
Art Gallery Bundle (#156227)
Art Gallery stamp set (#154421)
Floral Gallery dies (#154316)
PAPER
Merry Merlot (#146979), Basic White (#159276), Fine Art Floral Designer Series Paper (#154558)
INK
VersaMark (#102283, Merry Merlot (#147112)
ADHESIVES
Stampin' SEAL (#152813), Foam Adhesive Sheets (#152815), Stampin' Dimensionals (#104430), Mini Glue Dots (#103683)
TOOLS
Wild Rose Dies (#149547), Heat Tool (#129053), Take Your Pick Tool (#144107)
EMBELLISHMENTS
Artistry Blooms Adhesive-Backed Sequins (#152477), Gilded Leafing (#154560), 3/8" (1 Cm) Fine Art Ribbon (#154561), Heat & Stick Powder (#156110)
TIPS: The Gilded Leafing is packed tightly in the container and is super light so it can "float" around easily. Open the container carefully and consider storing the leafing in a larger storage container with a lid. This makes the leafing easier to use and also easier to return excess leafing once done.
Coordinating Products

TAKE ME BACK TO THE TOP
Current Host Code
PKTURGTS
CLICK TO SHOP WITH HC
See here how to use a Host CodeCLICK TO SHOP WITH HC

Free Newsletter!

Paper Pumpkin
SIGN ME UP!

Share With Friends
Most Recent Blog Posts
- FREE SHIPPING - DEC 14
- FREE SHIPPING from Oct 9th to 11th
- Stamp another Stack of Christmas Cards with Kevin & Christine
- Let the fun begin - again …
- Why wait? Join us now!
- Fitting Florets for any Occasion
- Festive Window Wishes
- Starter Kit + = No brainer!
- Perched in a Tree
- Awash in Beauty, so gorgeous!

.jpg)
.jpg)
.jpg)
.jpg)
.jpg)
.jpg)
.jpg)
.jpg)
.jpg)
.jpg)
.jpg)
.jpg)
.jpg)
.jpg)
.jpg)
.jpg)
.jpg)
.jpg)
.jpg)
.jpg)
.jpg)
.jpg)
.jpg)
.jpg)
.jpg)
.jpg)
.jpg)
.jpg)
.jpg)
.jpg)
.jpg)
.jpg)
.jpg)
.jpg)
.jpg)
.jpg)
.jpg)
.jpg)
.jpg)
.jpg)
.jpg)
.jpg)
.jpg)
.jpg)
.jpg)
.jpg)
.jpg)
.jpg)
.jpg)
.jpg)
.jpg)
.jpg)
.jpg)
.jpg)
.jpg)
.jpg)
.jpg)
.jpg)
.jpg)
.jpg)
.jpg)
.jpg)
.jpg)
.jpg)
.jpg)
.jpg)
.jpg)
.jpg)
.jpg)
.jpg)
.jpg)
.jpg)
.jpg)
.jpg)
.jpg)
.jpg)
.jpg)
.jpg)
.jpg)
.jpg)
.jpg)
.jpg)
.jpg)
.jpg)
.jpg)
.jpg)
.jpg)
.jpg)
.jpg)
.jpg)
.jpg)
.jpg)
.jpg)
.jpg)
.jpg)
.jpg)
.jpg)
.jpg)
.jpg)
.jpg)
.jpg)
.jpg)
.jpg)
.jpg)
.jpg)
.jpg)
.jpg)
.jpg)
.jpg)
.jpg)
.jpg)
.jpg)
.jpg)
.jpg)
.jpg)
.jpg)
.jpg)
.jpg)
.jpg)
.jpg)
.jpg)
.jpg)
.jpg)
.jpg)
.jpg)
.jpg)
.jpg)
.jpg)
.jpg)
.jpg)
.jpg)
.jpg)
.jpg)
.jpg)
.jpg)
.jpg)
.jpg)
.jpg)
.jpg)
.jpg)
.jpg)
.jpg)
.jpg)
.jpg)
.jpg)
.jpg)
.jpg)
.jpg)
.jpg)
.jpg)
.jpg)
.jpg)
.jpg)
.jpg)
.jpg)
.jpg)
.jpg)
.jpg)
.jpg)
.jpg)
.jpg)
.jpg)
.jpg)
.jpg)
.jpg)
.jpg)
.jpg)
.jpg)
.jpg)
.jpg)
.jpg)
.jpg)
.jpg)
.jpg)
.jpg)
.jpg)
.jpg)
.jpg)
.jpg)
.jpg)
.jpg)
.jpg)
.jpg)
.jpg)
.jpg)
.jpg)
.jpg)
.jpg)
.jpg)
.jpg)
.jpg)
.jpg)
.jpg)
.jpg)
.jpg)
.jpg)
.jpg)
.jpg)
.jpg)
.jpg)
.jpg)
.jpg)
.jpg)
.jpg)
.jpg)
.jpg)
.jpg)