Forever Greenery Suite - Colourful Forever Fern Card Tutorial
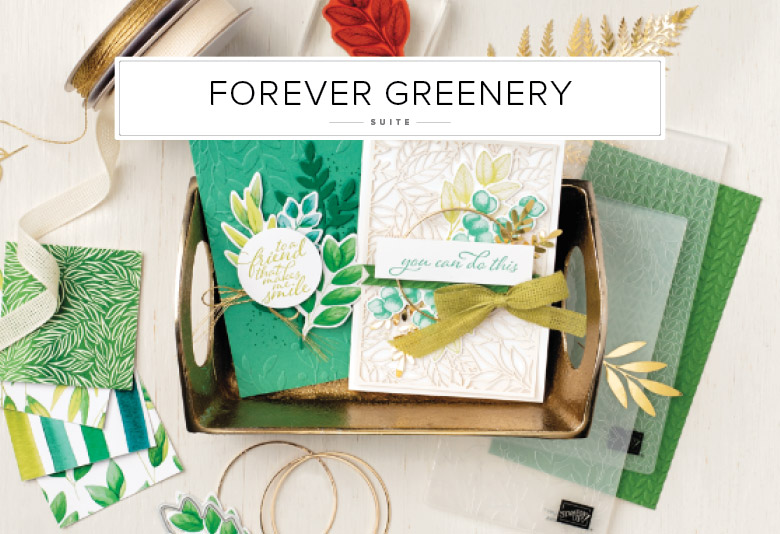
When you think of leaves you may think of autumn, but the Forever Greenery Suite is here to change your mind!
This gorgeous collection of leafy images and greetings is one of my top must-have items from the new Annual Catalogue. The detailed images are timeless and work with a variety of styles from rustic to modern. Use them alone for quick and simple cards or add the dies and coordinating embellishments to really create that wow effect.
These leaves won't fall behind in autumn, I'll be reaching for them to create all year-round. This shabby chic card tutorial is just one example of the colourful creations you can make with this suite!
Be happy and create and stamp a little ...
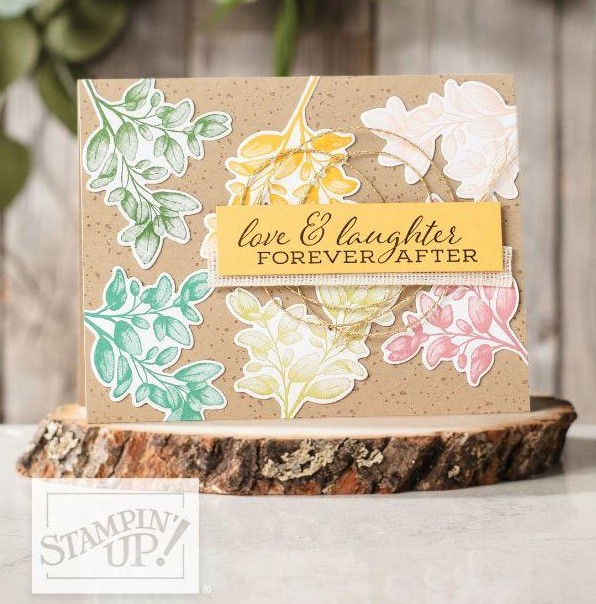
COLOURFUL FOREVER FERN CARD
INSTRUCTIONS:
1. Cut Crumb Cake cardstock to 5-1/2" x 8-1/2". Score at 4-1/4" along the 8-1/2" side and fold to create the card.
2. Stamp the card front with the splatter dot image from the Forever Fern stamp set (#152559) using Crumb Cake ink. Rotate the direction of the stamp for best results.
3. On scrap Whisper White cardstock stamp the leafy branch image. Stamp the image once each in six different colours, making sure to clean the stamp well between colours using the Simply Shammy. Stamp the leafy branch with Garden Green, Pear Pizzazz, Petal Pink, Rococo Rose, Just Jade, and Bumblebee.
4. Die cut the stamped images using the coordinating die from the Forever Flourishing Dies (#152714).
5. Adhere the die-cut branches to the card front with the leafy part towards the centre and the stems going off the edge of the card. The sample, clockwise from the top left, shows Garden Green, Bumblebee, Petal Pink, Rococo Rose, Pear Pizzazz, and Just Jade.
6. Trim of the die-cuts at the edge of the card with Paper Snips.
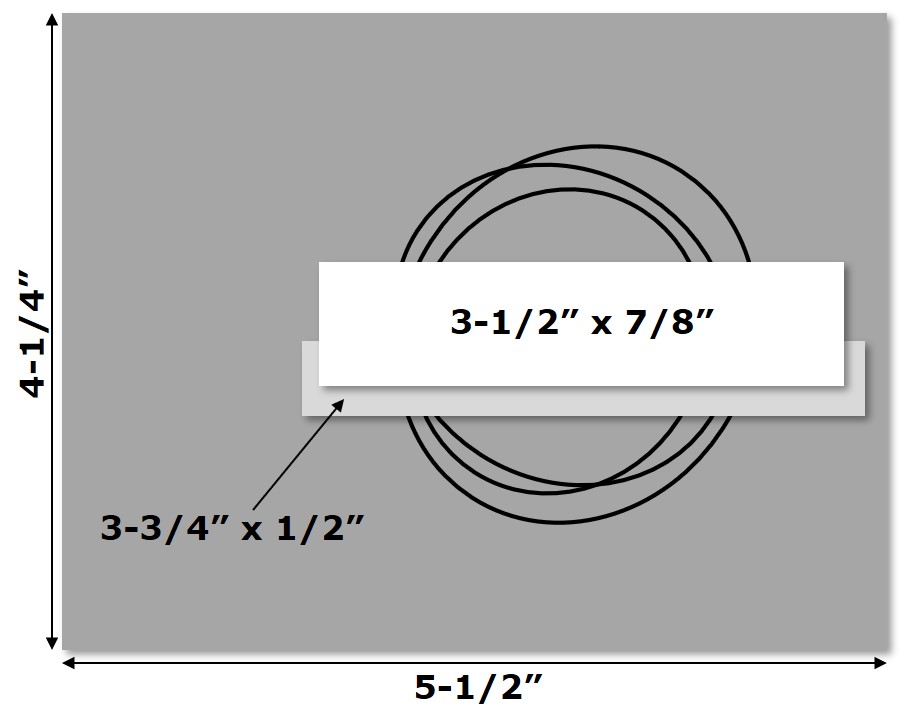
7. Stamp the greeting from the Forever Fern stamp set onto a 3-1/2" x 7/8" piece of Bumblebee cardstock with Black Memento ink.
8. Wrap about 28" of the thin gold trim from the Forever Greenery Trim Combo Pack around four fingers to create 3 loops.
9. Adhere to right centre of the card front with a couple Glue Dots that will be covered with the greeting layers.
10. Add adhesive to the bottom edge of the stamped greeting and adhere a 3-3/4" piece of Vanilla Ribbon from the Forever Greenery Trim Combo Pack sticking from behind the greeting.
11. Add Stampin' Dimensionals to the greeting layer and adhere the card front.
SUPPLIES:
STAMPS: Forever Fern (#152559)
PAPER: Whisper White (#100730), Crumb Cake (#120953), Bumblebee (#153077)
INK: Tuxedo Black Memento (#132708), Garden Green (#)147089, Pear Pizzazz (#147104), Petal Pink (#147108), Crumb Cake (#147116), Rococo Rose (#150080), Just Jade (#153115), Bumblebee (#153116)
TOOLS: Forever Flourishing Dies (#152714), Simply Shammy (#147042)
ADHESIVE: Stampin’ Dimensionals (#104430), Stampin' SEAL (#152813), Glue Dots (#103683)
EMBELLISHMENTS: Forever Greenery Trim Combo Pack (#152475)
TIPS: Use the Simply Shammy with water to clean stamp thoroughly between colours. It's easy to clean, reusable, and stores perfectly in a Standard Stamp Case (#119105).
In case you need any of the above supplies, please support my small business by shopping in my ONLINE STORE - THANK YOU!
TAKE ME BACK TO THE TOP




 Each month a fully designed project kit arrives in a delightful box filled with stamps, ink, and paper—everything cut and ready to go so you can skip to the fun. Just think of it as creativity in a box.

.jpg)
.jpg)
.jpg)
.jpg)
.jpg)
.jpg)
.jpg)
.jpg)
.jpg)
.jpg)
.jpg)
.jpg)
.jpg)
.jpg)
.jpg)
.jpg)
.jpg)
.jpg)
.jpg)
.jpg)
.jpg)
.jpg)
.jpg)
.jpg)
.jpg)
.jpg)
.jpg)
.jpg)
.jpg)
.jpg)
.jpg)
.jpg)
.jpg)
.jpg)
.jpg)
.jpg)
.jpg)
.jpg)
.jpg)
.jpg)
.jpg)
.jpg)
.jpg)
.jpg)
.jpg)
.jpg)
.jpg)
.jpg)
.jpg)
.jpg)
.jpg)
.jpg)
.jpg)
.jpg)
.jpg)
.jpg)
.jpg)
.jpg)
.jpg)
.jpg)
.jpg)
.jpg)
.jpg)
.jpg)
.jpg)
.jpg)
.jpg)
.jpg)
.jpg)
.jpg)
.jpg)
.jpg)
.jpg)
.jpg)
.jpg)
.jpg)
.jpg)
.jpg)
.jpg)
.jpg)
.jpg)
.jpg)
.jpg)
.jpg)
.jpg)
.jpg)
.jpg)
.jpg)
.jpg)
.jpg)
.jpg)
.jpg)
.jpg)
.jpg)
.jpg)
.jpg)
.jpg)
.jpg)
.jpg)
.jpg)
.jpg)
.jpg)
.jpg)
.jpg)
.jpg)
.jpg)
.jpg)
.jpg)
.jpg)
.jpg)
.jpg)
.jpg)
.jpg)
.jpg)
.jpg)
.jpg)
.jpg)
.jpg)
.jpg)
.jpg)
.jpg)
.jpg)
.jpg)
.jpg)
.jpg)
.jpg)
.jpg)
.jpg)
.jpg)
.jpg)
.jpg)
.jpg)
.jpg)
.jpg)
.jpg)
.jpg)
.jpg)
.jpg)
.jpg)
.jpg)
.jpg)
.jpg)
.jpg)
.jpg)
.jpg)
.jpg)
.jpg)
.jpg)
.jpg)
.jpg)
.jpg)
.jpg)
.jpg)
.jpg)
.jpg)
.jpg)
.jpg)
.jpg)
.jpg)
.jpg)
.jpg)
.jpg)
.jpg)
.jpg)
.jpg)
.jpg)
.jpg)
.jpg)
.jpg)
.jpg)
.jpg)
.jpg)
.jpg)
.jpg)
.jpg)
.jpg)
.jpg)
.jpg)
.jpg)
.jpg)
.jpg)
.jpg)
.jpg)
.jpg)
.jpg)
.jpg)
.jpg)
.jpg)
.jpg)
.jpg)
.jpg)
.jpg)
.jpg)
.jpg)
.jpg)
.jpg)
.jpg)
.jpg)
.jpg)
.jpg)
.jpg)
.jpg)
.jpg)
.jpg)
.jpg)
.jpg)
.jpg)