Playful Pets Suite Spotlight & FREE Card Tutorial
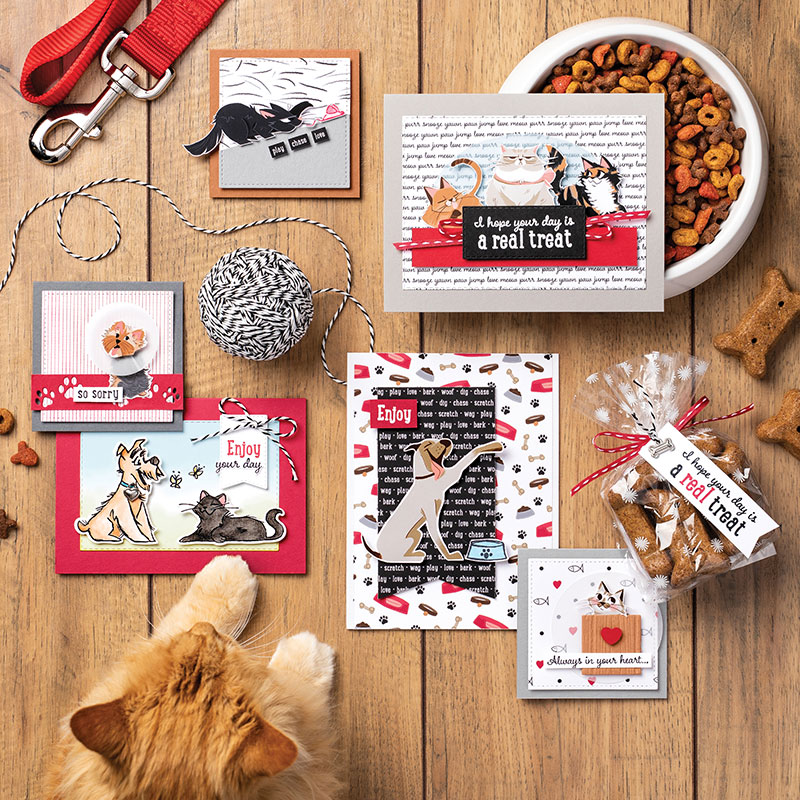
Pet lovers are howling with excitement over the purr-fectly whimsical Playful Pets suite. The Playful Pets bundle of stamps and dies are a must-have for anyone with a fur-baby. The Playful Pets Designer Series Paper is a great accent and some of the designs coordinate with the dies to create fast and fabulous pet cutouts.
In this tutorial I am showing one layout done two ways. The first is a simple stamping (#simplestamping) card using stamps, ink, and paper. The second card is the stepped up version that adds in die cutting, 3D embossing, and heat embossing. 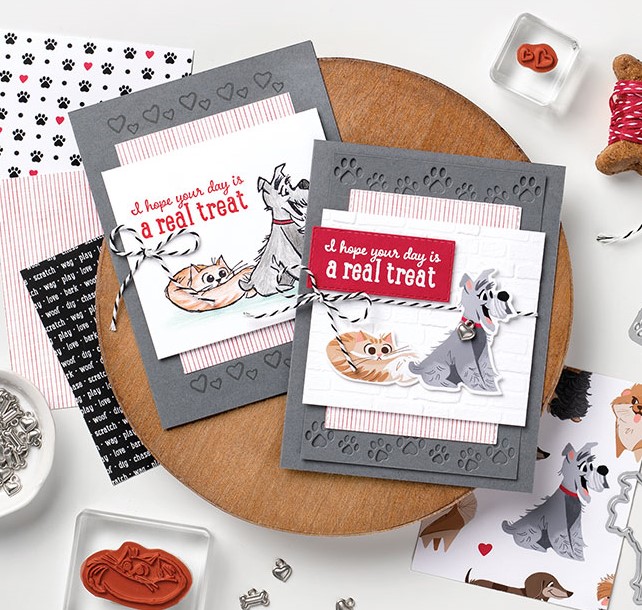
Playful Pets Simple Stamping and Stepped Up Cards
INSTRUCTIONS:
SIMPLE STAMPING CARD:
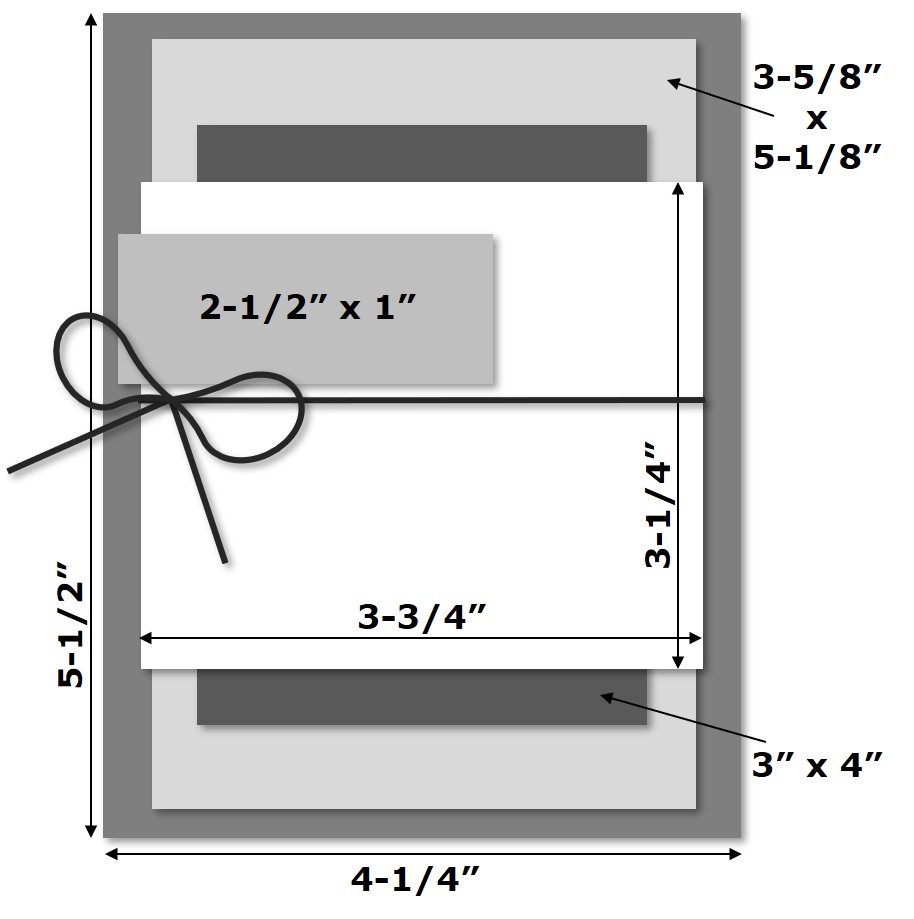
1) Cut Basic Gray cardstock to 5-1/2" x 8-1/2". Score at 4-1/4" along the 8-1/2" side.
2) Add 4" x 5-1/4" Whisper White cardstock inside the card as a writing area.
3) Adhere the 3" x 4" stripped Playful Pets Designer Series Paper centred on the card front.
4) Stamp heart images above and below the stripped paper with Basic Gray ink.
5) Stamp dog image on a piece of sticky note paper to create a mask. Fussy cut out just the left side of dog image.
6) Stamp the dog on 3-3/4" x 3-1/4" Whisper White cardstock layer with Black StazOn ink.
7) Line up the mask on the stamped dog image and then stamp the cat partly overlapping the dog image. The mask will make it look like the cat is behind the dog.
8) Colour the cat and dog images in with Watercolour Pencils: Basic Gray, Real Red, Melon Mambo, Basic Black, Bermuda Bay, Whisper White, and Cajun Craze.
9) Stamp greeting on top left of Whisper White layer with Real Red ink.
10) Adhere Whisper White layer to centre of card front with Stampin' Dimensionals.
11) Tie a bow in the Baker's Twine. Adhere to card with a Mini Glue Dot.
STEPPED UP CARD:
2) Cut Basic Gray cardstock to 5-1/2" x 8-1/2". Score at 4-1/4" along the 8-1/2" side.
3) Add 4" x 5-1/4" Whisper White cardstock inside the card as a writing area.
4) Use the Playful Pets dies cut small peak thru paws in a row at the top and bottom of the 3-5/8" x 5-1/8" Basic Gray cardstock layer. Adhere layer centred on the card front.
5) Adhere the 3" x 4" stripped Playful Pets Designer Series Paper centred on the die cut layer.
6) Emboss 3-3/4" x 3-1/4" Whisper White cardstock layer with Brick & Mortar 3D Embossing Folder.
7) Wrap Baker's Twine around embossed layer and tie a bow at the left edge.
8) Die cut cat and dog images from the Playful Pets Designer Series Paper with the coordinating dies. Adhere die cut animals to Whisper White embossed layer with Stampin' Dimensionals.
9) Adhere layer centred on the card front with Stampin' Dimensionals.
10) Stamp greeting on 2-1/2" x 1" Real Red cardstock with VersaMark ink. Cover ink generously with White Stampin' Emboss Powder. Tap off excess powder. Heat emboss with Heat Tool. Adhere on card with Stampin' Dimensionals.
11) Use a Mini Glue Dot to adhere Playful Pets Trinket to the dog's collar.
SUPPLIES:
BOTH CARDS:
STAMPS: Stamp Set Cling Pampered Pets (#152520)
PAPER: Whisper White cardstock (#100730), Basic Gray cardstock (#121044), Playful Pets Designer Series Paper (#152489)
ADHESIVE: Mini Glue Dots (#103683),Stampin’ Dimensionals (#104430),Stampin' Seal (#152813)
EMBELLISHMENTS: Playful Pets Trim Combo Pack (#152466)
SIMPLE STAMPING CARD:
INK: Jet Black StaZon Pad (#101406), Watercolour Pencils (#141709), Watercolour Pencils Assortment 2 (#149014), Real Red Ink Pad (#147084), Basic Gray Ink Pad (#149165)
OTHER:Sticky Note
STEPPED UP CARD:
PAPER: Real Red cardstock (#102482), VersaMark Pad (#102283)
TOOLS: Brick & Mortar 3D Embossing Folder (#149643), Pet Dies (#152705), Heat Tool (#129053)
EMBELLISHMENTS: White Stampin’ Emboss Powder (#109132), Playful Pets Trinkets (#152465)
TIPS: When creating a mask, stamp the image over the sticky section of a sticky note so that the sticky will help the mask stay in place while stamping.
In case you need any of the above supplies, please support my small business by shopping in my ONLINE STORE - THANK YOU!
TAKE ME BACK TO THE TOP
Current Host Code
CLICK TO SHOP WITH HC

Free Newsletter!

Paper Pumpkin
SIGN ME UP!

Share With Friends
Most Recent Blog Posts
- FREE SHIPPING - DEC 14
- FREE SHIPPING from Oct 9th to 11th
- Stamp another Stack of Christmas Cards with Kevin & Christine
- Let the fun begin - again …
- Why wait? Join us now!
- Fitting Florets for any Occasion
- Festive Window Wishes
- Starter Kit + = No brainer!
- Perched in a Tree
- Awash in Beauty, so gorgeous!

.jpg)
.jpg)
.jpg)
.jpg)
.jpg)
.jpg)
.jpg)
.jpg)
.jpg)
.jpg)
.jpg)
.jpg)
.jpg)
.jpg)
.jpg)
.jpg)
.jpg)
.jpg)
.jpg)
.jpg)
.jpg)
.jpg)
.jpg)
.jpg)
.jpg)
.jpg)
.jpg)
.jpg)
.jpg)
.jpg)
.jpg)
.jpg)
.jpg)
.jpg)
.jpg)
.jpg)
.jpg)
.jpg)
.jpg)
.jpg)
.jpg)
.jpg)
.jpg)
.jpg)
.jpg)
.jpg)
.jpg)
.jpg)
.jpg)
.jpg)
.jpg)
.jpg)
.jpg)
.jpg)
.jpg)
.jpg)
.jpg)
.jpg)
.jpg)
.jpg)
.jpg)
.jpg)
.jpg)
.jpg)
.jpg)
.jpg)
.jpg)
.jpg)
.jpg)
.jpg)
.jpg)
.jpg)
.jpg)
.jpg)
.jpg)
.jpg)
.jpg)
.jpg)
.jpg)
.jpg)
.jpg)
.jpg)
.jpg)
.jpg)
.jpg)
.jpg)
.jpg)
.jpg)
.jpg)
.jpg)
.jpg)
.jpg)
.jpg)
.jpg)
.jpg)
.jpg)
.jpg)
.jpg)
.jpg)
.jpg)
.jpg)
.jpg)
.jpg)
.jpg)
.jpg)
.jpg)
.jpg)
.jpg)
.jpg)
.jpg)
.jpg)
.jpg)
.jpg)
.jpg)
.jpg)
.jpg)
.jpg)
.jpg)
.jpg)
.jpg)
.jpg)
.jpg)
.jpg)
.jpg)
.jpg)
.jpg)
.jpg)
.jpg)
.jpg)
.jpg)
.jpg)
.jpg)
.jpg)
.jpg)
.jpg)
.jpg)
.jpg)
.jpg)
.jpg)
.jpg)
.jpg)
.jpg)
.jpg)
.jpg)
.jpg)
.jpg)
.jpg)
.jpg)
.jpg)
.jpg)
.jpg)
.jpg)
.jpg)
.jpg)
.jpg)
.jpg)
.jpg)
.jpg)
.jpg)
.jpg)
.jpg)
.jpg)
.jpg)
.jpg)
.jpg)
.jpg)
.jpg)
.jpg)
.jpg)
.jpg)
.jpg)
.jpg)
.jpg)
.jpg)
.jpg)
.jpg)
.jpg)
.jpg)
.jpg)
.jpg)
.jpg)
.jpg)
.jpg)
.jpg)
.jpg)
.jpg)
.jpg)
.jpg)
.jpg)
.jpg)
.jpg)
.jpg)
.jpg)
.jpg)
.jpg)
.jpg)
.jpg)
.jpg)
.jpg)
.jpg)
.jpg)
.jpg)
.jpg)
.jpg)
.jpg)
.jpg)
.jpg)