Peaceful Poppies Suite & Painted Poppies Watercolour Card Tutorial
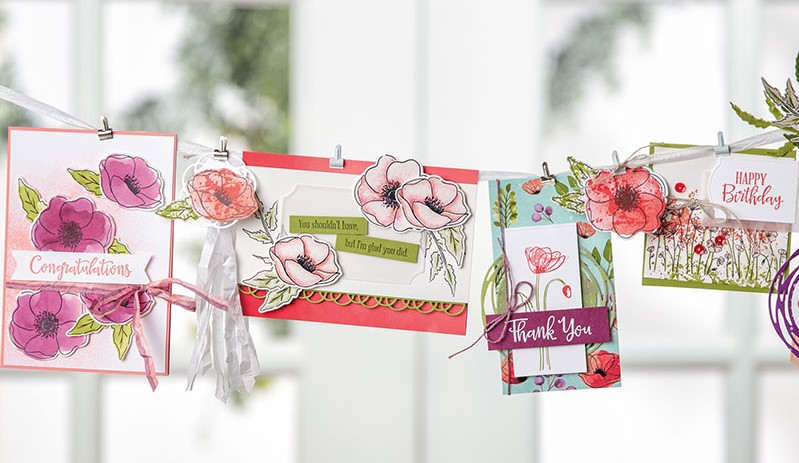
Painted Poppies Spotlight
The Peaceful Poppies suite includes two bundles, plus tons of gorgeous accessories. This suite is so amazing we have to call it a super-suite! The Painted Poppies bundle (#153827) and Peaceful Moments bundle (#153824) are both stamp set and die bundles and they both coordinate with each other, as well as, with the other elements of the suite. Talk about a super-suite that really blooms with creativity!
The Painted Poppies bundle is ideal for techniques like water-colouring and colouring with Stampin' Blends.
This lovely card features water-colouring, modified die, and modified embellishments techniques.I think you'll love the techniques and the beautiful card you'll create!
Be happy, create and stamp a little ....

VIEW THE PEACEFUL POPPIES SUITE ONLINE HERE
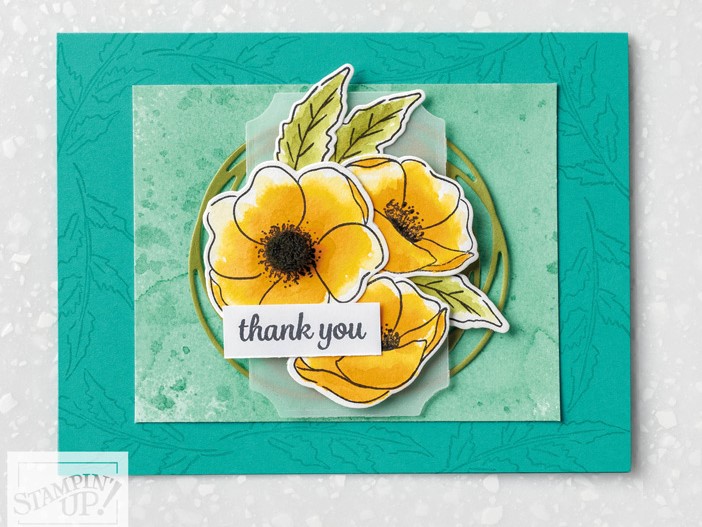
Painted Poppies Watercolour Card
INSTRUCTIONS:
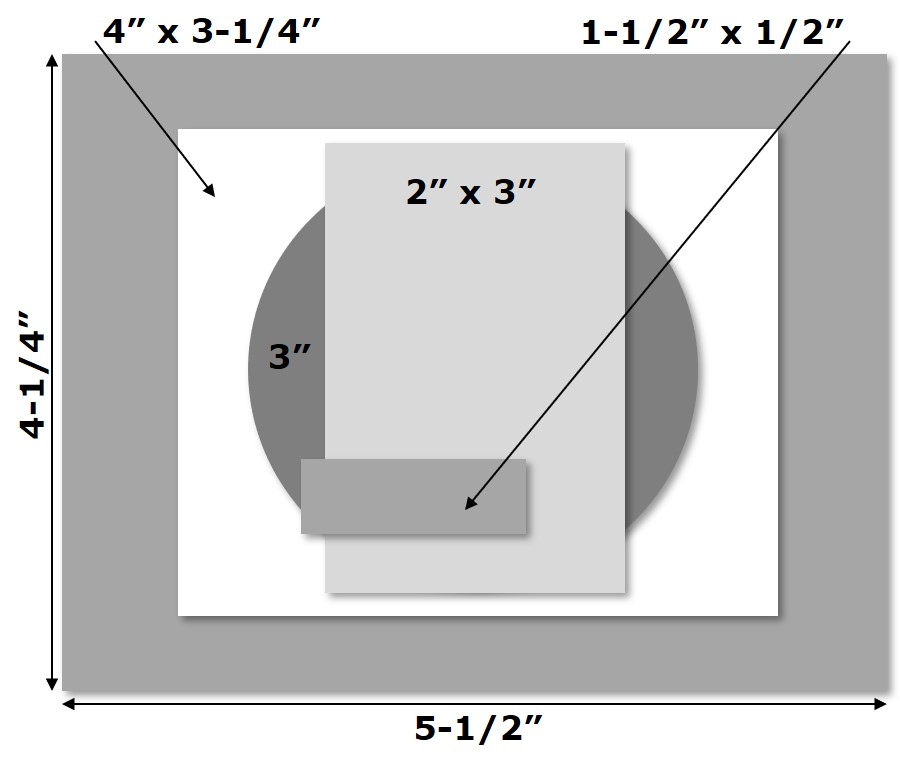
- Cut Bermuda Bay cardstock to 5-1/2" x 8-1/2". Score at 4-1/4" along the 8-1/2" side.
- Stamp multi-leaf image from Painted Poppies stamp set randomly on card front with Coastal Cabana ink.
- Cut Fluid 100 Watercolour Paper to 4" x 3-1/4". Protect your work surface with Grid Paper or similar.
- Press Coastal Cabana ink pad directly onto the E-sized acrylic Clear Block. Mist the inked block with water using the Stampin' Spritzer. Let the water a ink combine for a few seconds. Carefully flip the block over onto the Watercolour Paper on a protected surface. To create a good watercolour wash, let the Watercolour Paper absorb the ink and water for about 5 seconds before removing the block. Set aside to dry.
- Stamp one full flower image, two side-view flower images, and three single-leaf images on Watercolour Paper with StazOn ink. Allow space between images so they can be die cut after watercolouring.
- Watercolour flowers and leaves with Aqua Painters using Mango Melody, Pumpkin Pie and Old Olive inks. Allow to dry completely.
- Once the watercoloured flowers and leaves are dry, die cut them with the coordinating dies from the Painted Labels Dies.
- Cut Vellum Cardstock with largest label die from the Painted Labels Dies.
- Adhere die cut flowers and leaves to the Vellum label with Mini Glue Dots and Stampin' Dimensionals.
- Cut Old Olive cardstock with swirl die from Painted Labels Dies. Cut die cut swirl in half and adhere behind vellum label and flowers with Glue Dots. Place Glue Dots where they will not show through the Vellum.
- Adhere watercolour wash background centred on the card front. Use Stampin' Dimensionals to adhere the flower and tag layers to the centre of the card.
- Colour one of the fuzzy yellow Perennial Essence flower centres with Jet Black StazOn ink to make it black. Use a mostly dry Aqua Painter to dab the ink onto the fuzzy surface. Let dry completely. Adhere to the centre of the full flower image once dry. StazOn may stain the Aqua Painter, but it will not
- Stamp "thank you" greeting from the Beautifully Braided stamp set on 1-1/2" x 1/2" Whisper White cardstock with Jet Black StazOn ink. Adhere greeting to flowers with Mini Glue Dots or Stampin' Dimensionals.
SUPPLIES:
STAMPS: Painted Poppies (#151599) & Beautifully Braided (#151637)CARDSTOCK: Whisper White (#100730), Old Olive (#100702), Bermuda Bay (#131197)
PAPER: Fluid 100 Watercolour Paper (# 149612), Vellum Cardstock (#101856)
INK: Jet Black StazOn (#101406), Pumpkin Pie (#147086), Old Olive (#147090), Mango Melody (#147093), Coastal Cabana (#147097)
ACCESSORIES: Perennial Essence Floral Centers (#149442)
ADHESIVES: SNAIL (#104331), Stampin' Dimensionals (#104430), Mini Glue Dots (#103683)
TOOLS: Aqua Painters (#103954), Stampin' Spritzer (#126185), Painted Labels Dies (#151605), Clear Block E (#118484), Grid Paper (#130148)
TAKE ME BACK TO THE TOP


 Each month a fully designed project kit arrives in a delightful box filled with stamps, ink, and paper—everything cut and ready to go so you can skip to the fun. Just think of it as creativity in a box.

.jpg)
.jpg)
.jpg)
.jpg)
.jpg)
.jpg)
.jpg)
.jpg)
.jpg)
.jpg)
.jpg)
.jpg)
.jpg)
.jpg)
.jpg)
.jpg)
.jpg)
.jpg)
.jpg)
.jpg)
.jpg)
.jpg)
.jpg)
.jpg)
.jpg)
.jpg)
.jpg)
.jpg)
.jpg)
.jpg)
.jpg)
.jpg)
.jpg)
.jpg)
.jpg)
.jpg)
.jpg)
.jpg)
.jpg)
.jpg)
.jpg)
.jpg)
.jpg)
.jpg)
.jpg)
.jpg)
.jpg)
.jpg)
.jpg)
.jpg)
.jpg)
.jpg)
.jpg)
.jpg)
.jpg)
.jpg)
.jpg)
.jpg)
.jpg)
.jpg)
.jpg)
.jpg)
.jpg)
.jpg)
.jpg)
.jpg)
.jpg)
.jpg)
.jpg)
.jpg)
.jpg)
.jpg)
.jpg)
.jpg)
.jpg)
.jpg)
.jpg)
.jpg)
.jpg)
.jpg)
.jpg)
.jpg)
.jpg)
.jpg)
.jpg)
.jpg)
.jpg)
.jpg)
.jpg)
.jpg)
.jpg)
.jpg)
.jpg)
.jpg)
.jpg)
.jpg)
.jpg)
.jpg)
.jpg)
.jpg)
.jpg)
.jpg)
.jpg)
.jpg)
.jpg)
.jpg)
.jpg)
.jpg)
.jpg)
.jpg)
.jpg)
.jpg)
.jpg)
.jpg)
.jpg)
.jpg)
.jpg)
.jpg)
.jpg)
.jpg)
.jpg)
.jpg)
.jpg)
.jpg)
.jpg)
.jpg)
.jpg)
.jpg)
.jpg)
.jpg)
.jpg)
.jpg)
.jpg)
.jpg)
.jpg)
.jpg)
.jpg)
.jpg)
.jpg)
.jpg)
.jpg)
.jpg)
.jpg)
.jpg)
.jpg)
.jpg)
.jpg)
.jpg)
.jpg)
.jpg)
.jpg)
.jpg)
.jpg)
.jpg)
.jpg)
.jpg)
.jpg)
.jpg)
.jpg)
.jpg)
.jpg)
.jpg)
.jpg)
.jpg)
.jpg)
.jpg)
.jpg)
.jpg)
.jpg)
.jpg)
.jpg)
.jpg)
.jpg)
.jpg)
.jpg)
.jpg)
.jpg)
.jpg)
.jpg)
.jpg)
.jpg)
.jpg)
.jpg)
.jpg)
.jpg)
.jpg)
.jpg)
.jpg)
.jpg)
.jpg)
.jpg)
.jpg)
.jpg)
.jpg)
.jpg)
.jpg)
.jpg)
.jpg)
.jpg)
.jpg)
.jpg)
.jpg)
.jpg)
.jpg)
.jpg)
.jpg)
.jpg)