
Hi, I'm Christine Alward and welcome to my website. I have been a demonstrator with Stampin' Up! since December 2009, and I love paper crafting and card making.
I love to make people feel good and happy about their accomplishments, big or small, and I can never get enough of the smiles and pride I see on my customers' faces when they look at a finished project.
So many have told me that they have no creativity or talent when it comes to crafting, and all I would ask them is to give it a try and let me prove them wrong. Watching happy clients of all ages leave my classes with their finished cards and projects is what I like best about my job as independent Stampin' Up! demonstrator. I hope you will find inspiration in the projects I present here and that you will join me in my studio for a class.

Modern Wishes & Wonder Card Tutorial
WONDER OF THE SEASON SUITE - pg 30 to 33 of the 2020 Aug-Dec Mini
When you think of Christmas what do you imagine? I don not have visions of sugarplums dancing in my head, but I do picture reindeer, sleighs with bells, and a cozy home decorated with mistletoe, lights, and garland.
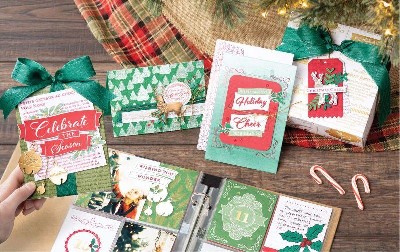
You will find those traditional colours and iconic images of Christmas in the Wonder of the Season Suite. This mega suite includes two stamp and die combos, two Designer Series Paper choices, a Memories & More Card Pack with coordinating decorative Card & Envelopes, plus embellishments and ribbon to put the perfect finishing touches on your holiday projects.
Even a perfectly traditional stamp set can take on a modern flair when combined with non-traditional colours and layout. I think you are going to love the unexpected look of the trendy card I'm sharing in the tutorial below. Which style is your favorite traditional or non-traditional?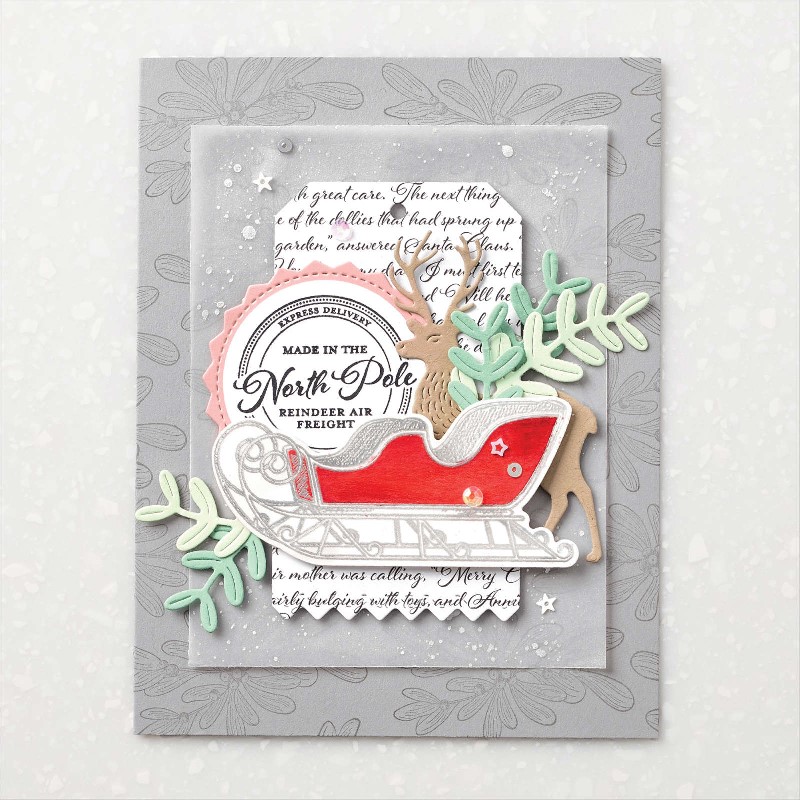
Modern Wishes & Wonder Card
INSTRUCTIONS:
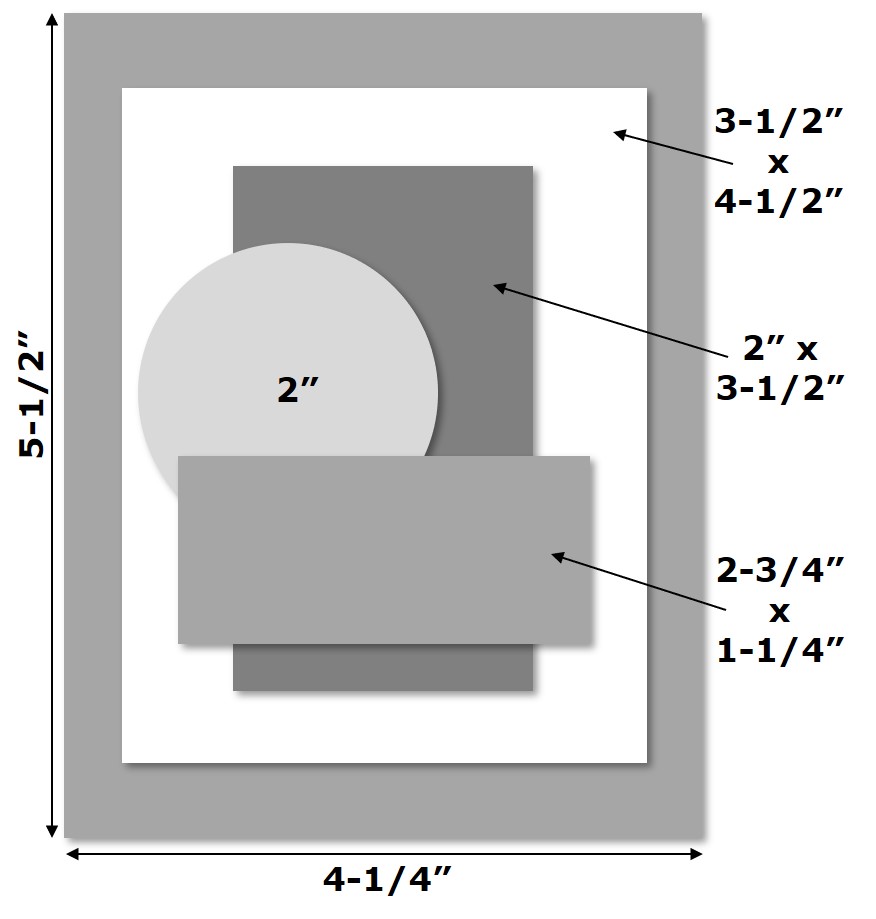
1) Cut Smoky Slate cardstock to 5-1/2" x 8-1/2". Score at 4-1/4" along the 8-1/2" side. Fold along score line.
2) Stamp the mistletoe image randomly across the card front with VersaMark ink.
3) Stamp the sleigh image of Shimmery White cardstock with VersaMark ink. Cover generously with Silver Stampin' Emboss Powder. Tap off excess powder and emboss with the Heat Tool.
4) Die cut sleigh with the coordinating die from the North Pole Wonder Dies. Use the Real Red ink pad and a Water Painter to watercolor the sleigh. Set aside to dry. Clean Water Painter well by squeezing water through it and wiping on a Simply Shammy or paper towel until it runs clear again.
5) Cut Vellum to 3-1/2" x 4-1/2". Place on a sheet of Grid Paper or other to protect your work surface. On a scrap of Vellum or inside the VersaMark Pad lid, mix a couple drops of VersaMark Ink refill with a couple drops of water from a Water Painter brush.
6) Hold the brush in one hand over the Vellum. Place your other hand sideways under the brush, like you are going to shake hands. Tap the brush against the side of your fingers to create splatters of the VersaMark and water mix on the Vellum. Pick up more ink and repeat until you have created your preferred amount of splatter over the Vellum. It will be hard to see since it's clear. You can add more later if you wish. Clean the Water Painter brush tip well to remove the VersaMark.
7) Generously cover the Vellum with Silver Stampin' Emboss Powder. Tap off excess powder. Heat Emboss with the Heat Tool. When embossing on Vellum, I recommend the low heat setting. Allow the Heat Tool to warm up first and be sure to keep the Heat Tool moving so you do not overheat and melt the paper. The Vellum may warp from the heat, heat it gently from the back side to help uncurl it a bit.
8) Die cut the script pattern of the Wonder of the Season Specialty Designer Series Paper with the tag from the North Pole Wonder Dies.
9) Adhere tag to the center of the Vellum. Add Adhesive to the back of the Vellum behind the tag where it will be hidden and adhere the layers to the card front.
10) Stamp circular North Pole greeting on Whisper White cardstock with Jet Black StazOn or Tuxedo Black Memento ink. Die cut with circle die from the North Pole Wonder Dies.
11) Die cut scrap Blushing Bride cardstock with the large scallop circle die. Layer under the stamped circle and adhere off the center left edge of the tag layer.
12) Die cut scrap Crumb Cake cardstock with the larger reindeer die. Add to card front slightly overlapping the circles.
13) Die cut 3 smaller leafy branches from Soft Sea Foam cardstock and 2 larger branches from Mint Macaron cardstock. Add to card with Glue Dots or Multipurpose Liquid Glue.
14) Add sleigh to card with Stampin' Dimensionals.
15) Use small dots of Multipurpose Liquid Glue to add Snowflake Sequins to vellum and sleigh. It's easiest to place a tiny dot of glue on the card and add the sequin instead of trying to put glue onto the sequin.
TIP: The putty tip of the Take Your Pick Tool (#144107) works great for picking up and placing small items like sequins.
SUPPLIES:
BUNDLE: Wishes & Wonder Bundle (#155151)
PAPER: Whisper White (#100730),Vellum (#101856), Shimmery White (#101910), Crumb Cake (#120953), Blushing Bride (#131198), Smoky Slate (#131202), Mint Macaron (#138337), Soft Sea Foam (#146988), Wonder Of The Season Specialty Designer Series Paper (#153488)
INK: Jet Black StazOn (#101406) or Tuxedo Black Memento (#132708), VersaMark Pad (#102283), VersaMark Ink Refill (#102193),Real Red (#147084)
TOOLS: Water Painters (#151298), Heat Tool (#129053), Stampin' Cut & Emboss Machine (#149653)
EMBELLISHMENTS: Silver Stampin’ Emboss Powder (#109131), Snowflake Sequins (#150443)
ADHESIVES: Stampin’ Dimensionals (#104430), Multipurpose Liquid Glue (#110755), Glue Dots (#103683), Stampin' SEAL (#152813)
In case you need any of the above supplies, please support my small business by shopping in my ONLINE STORE - THANK YOU!

Current Host Code
CLICK TO SHOP WITH HC


Information and Registration
for all our Joint Crafting Events
Free Newsletter!

Paper Pumpkin
SIGN ME UP!

Share With Friends
Most Recent Blog Posts
- FREE SHIPPING - DEC 14
- FREE SHIPPING from Oct 9th to 11th
- Stamp another Stack of Christmas Cards with Kevin & Christine
- Let the fun begin - again …
- Why wait? Join us now!
- Fitting Florets for any Occasion
- Festive Window Wishes
- Starter Kit + = No brainer!
- Perched in a Tree
- Awash in Beauty, so gorgeous!
