 Hi, I'm Christine Alward and welcome to my website. I have been a demonstrator with Stampin' Up! since December 2009, and I love paper crafting and card making.
 I love to make people feel good and happy about their accomplishments, big or small, and I can never get enough of the smiles and pride I see on my customers' faces when they look at a finished project.
So many have told me that they have no creativity or talent when it comes to crafting, and all I would ask them is to give it a try and let me prove them wrong. Watching happy clients of all ages leave my classes with their finished cards and projects is what I like best about my job as independent Stampin' Up! demonstrator. I hope you will find inspiration in the projects I present here and that you will join me in my studio for a class.

Rustic Glam Snowflake Card - Free Tutorial
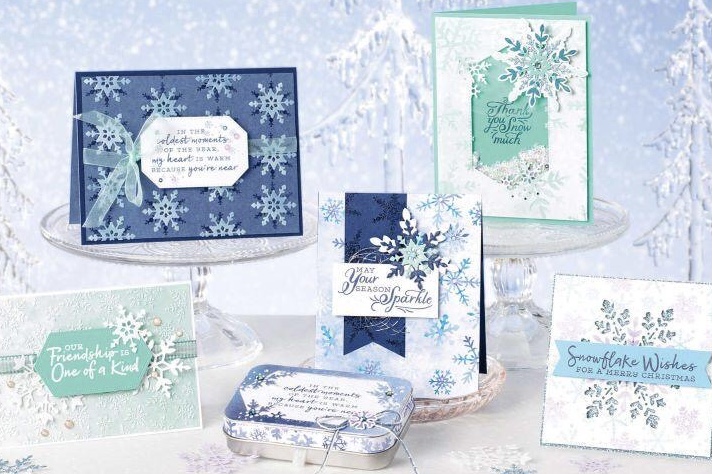
You may want to grab a cup of cocoa and a cozy sweater before you sit down to create with the Snowflake Splendor Suite! This stamp and die bundle will help you create a blizzard of snowflakes for the perfect storm of winter crafting.
The Snowflake Splendor Designer Series Paper complements the stamps and dies with hand-painted, watercolor snowflakes in lots of icy purples and blues.
The tutorial I'm sharing changes up the colours and design for a bit of rustic glamour and a little tweak to the standard card size.


Rustic Glam Snowflake Wishes Card
INSTRUCTIONS:
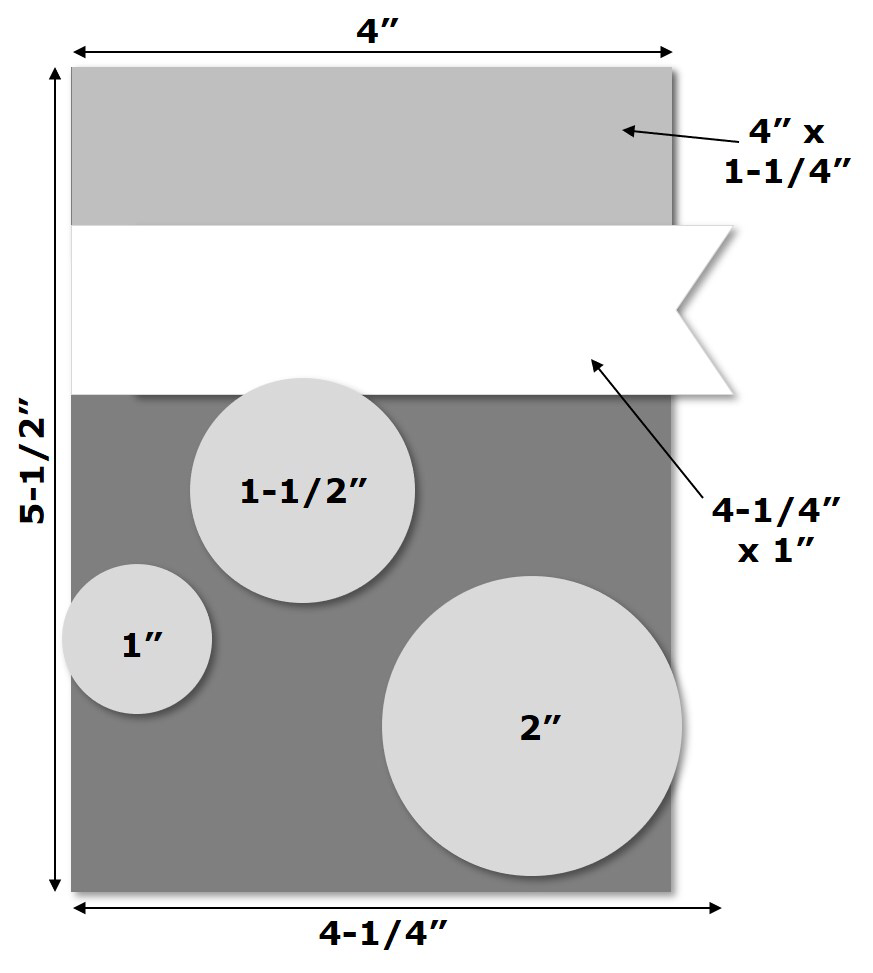
1) Cut Crumb Cake cardstock to 5-1/2" x 8". Score at 4" along the 8" side. Fold on score line. (NOTE: This card is slightly more narrow than the standard 4-1/4" x 5-1/2" card, but the overall size will be standard since the banner label extends out to 4-1/4").
2) Create your own Snowflake Designer Series Paper by stamping at least 5 different sizes of Snowflake Wishes snowflakes onto card front with Whisper White Craft ink. Set aside to dry or speed drying time with the Heat Tool.
3) Cut Real Red pinstripe 'Tis the Season Designer Series Paper to 4" x 1-1/4". Adhere to the top of the 4" x 5-1/2" card front.
4) Use the Triple Banner Punch to punch one end of a 5-1/4" x 1" strip of Whisper White cardstock.
5) Stamp greeting on center of strip with VersaMark ink. Cover generously with Gold Stampin' Emboss Powder. Tap off excess powder. Heat emboss with the Heat Tool.
6) Add greeting to card with Stampin' Dimensionals so it is just covering the bottom edge of the Real Red patterned paper.
7) Die cut Gold Foil Sheet with the second, third, and fourth smallest So Many Snowflakes Dies.
8) Adhere snowflakes to card with Glue Dots.
9) Add the clear Wonderful Gems with their gold flecks to the center of each stamped and each die cut snowflake.
SUPPLIES:
STAMPS & DIES: Snowflake Wishes Bundle (#155172)
PAPER: Crumb Cake (#120953), Whisper White Thick (#140272), Gold Foil Sheets (#132622), 'Tis The Season Designer Series Paper (#153489)
INK: Whisper White Uninked Pad & Refill (#147277), VersaMark Pad (#102283)
TOOLS: Banner Triple Punch (#138292), Heat Tool (#129053)
EMBELLISHMENTS: Gold Stampin’ Emboss Powder (#109129), Wonderful Gems (#153536)
ADHESIVES: Stampin' SEAL (#152813), Mini Glue Dots (#103683), Stampin' Dimensional (#104430)
TIPS: The Whisper White Craft Ink is a nice thick, opaque pigment ink that gives excellent coverage. It takes more time to dry than Classic ink. The Heat Tool can be used to speed up drying time and prevent smearing. The ink pad comes uninked so you can adjust how juicy you make the pad. Ink the Uninked Whisper White Craft Pad with the included Whisper White Craft Ink Refill. Use a Bone Folder or Palette Knife to smooth the ink into the pad. It will need to be reinked frequently and almost every time you use it.
In case you need any of the above supplies, please support my small business by shopping in my ONLINE STORE - THANK YOU!

Current Host Code
CLICK TO SHOP WITH HC


Free Newsletter!

Paper Pumpkin
SIGN ME UP!

Share With Friends
Most Recent Blog Posts
- FREE SHIPPING - DEC 14
- FREE SHIPPING from Oct 9th to 11th
- Stamp another Stack of Christmas Cards with Kevin & Christine
- Let the fun begin - again …
- Why wait? Join us now!
- Fitting Florets for any Occasion
- Festive Window Wishes
- Starter Kit + = No brainer!
- Perched in a Tree
- Awash in Beauty, so gorgeous!

.jpg)
.jpg)
.jpg)
.jpg)
.jpg)
.jpg)
.jpg)
.jpg)
.jpg)
.jpg)
.jpg)
.jpg)
.jpg)
.jpg)
.jpg)
.jpg)
.jpg)
.jpg)
.jpg)
.jpg)
.jpg)
.jpg)
.jpg)
.jpg)
.jpg)
.jpg)
.jpg)
.jpg)
.jpg)
.jpg)
.jpg)
.jpg)
.jpg)
.jpg)
.jpg)
.jpg)
.jpg)
.jpg)
.jpg)
.jpg)
.jpg)
.jpg)
.jpg)
.jpg)
.jpg)
.jpg)
.jpg)
.jpg)
.jpg)
.jpg)
.jpg)
.jpg)
.jpg)
.jpg)
.jpg)
.jpg)
.jpg)
.jpg)
.jpg)
.jpg)
.jpg)
.jpg)
.jpg)
.jpg)
.jpg)
.jpg)
.jpg)
.jpg)
.jpg)
.jpg)
.jpg)
.jpg)
.jpg)
.jpg)
.jpg)
.jpg)
.jpg)
.jpg)
.jpg)
.jpg)
.jpg)
.jpg)
.jpg)
.jpg)
.jpg)
.jpg)
.jpg)
.jpg)
.jpg)
.jpg)
.jpg)
.jpg)
.jpg)
.jpg)
.jpg)
.jpg)
.jpg)
.jpg)
.jpg)
.jpg)
.jpg)
.jpg)
.jpg)
.jpg)
.jpg)
.jpg)
.jpg)
.jpg)
.jpg)
.jpg)
.jpg)
.jpg)
.jpg)
.jpg)
.jpg)
.jpg)
.jpg)
.jpg)
.jpg)
.jpg)
.jpg)
.jpg)
.jpg)
.jpg)
.jpg)
.jpg)
.jpg)
.jpg)
.jpg)
.jpg)
.jpg)
.jpg)
.jpg)
.jpg)
.jpg)
.jpg)
.jpg)
.jpg)
.jpg)
.jpg)
.jpg)
.jpg)
.jpg)
.jpg)
.jpg)
.jpg)
.jpg)
.jpg)
.jpg)
.jpg)
.jpg)
.jpg)
.jpg)
.jpg)
.jpg)
.jpg)
.jpg)
.jpg)
.jpg)
.jpg)
.jpg)
.jpg)
.jpg)
.jpg)
.jpg)
.jpg)
.jpg)
.jpg)
.jpg)
.jpg)
.jpg)
.jpg)
.jpg)
.jpg)
.jpg)
.jpg)
.jpg)
.jpg)
.jpg)
.jpg)
.jpg)
.jpg)
.jpg)
.jpg)
.jpg)
.jpg)
.jpg)
.jpg)
.jpg)
.jpg)
.jpg)
.jpg)
.jpg)
.jpg)
.jpg)
.jpg)
.jpg)
.jpg)
.jpg)
.jpg)
.jpg)
.jpg)
.jpg)
.jpg)
.jpg)
.jpg)
.jpg)