 Hi, I'm Christine Alward and welcome to my website. I have been a demonstrator with Stampin' Up! since December 2009, and I love paper crafting and card making.
 I love to make people feel good and happy about their accomplishments, big or small, and I can never get enough of the smiles and pride I see on my customers' faces when they look at a finished project.
So many have told me that they have no creativity or talent when it comes to crafting, and all I would ask them is to give it a try and let me prove them wrong. Watching happy clients of all ages leave my classes with their finished cards and projects is what I like best about my job as independent Stampin' Up! demonstrator. I hope you will find inspiration in the projects I present here and that you will join me in my studio for a class.

Peaceful Poppies Elements Tutorial
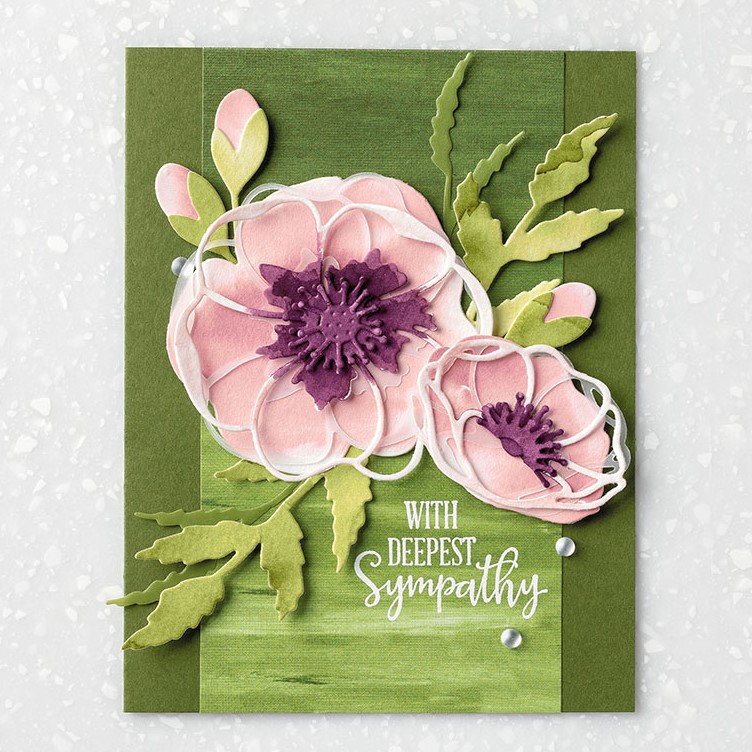
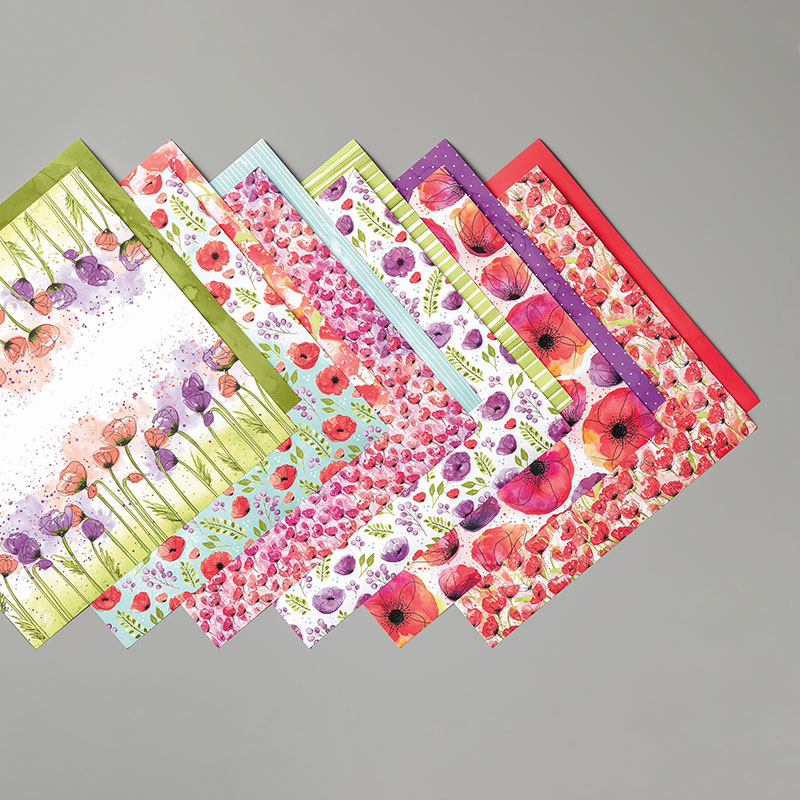
It may not feel like it, but spring is just around the corner. I'm shaking off the winter blues by creating with some gorgeous new floral stamps from the Mini Catalogue. I think you'll love the style and luxurious colours of the Peaceful Poppies Suite as much as I do.
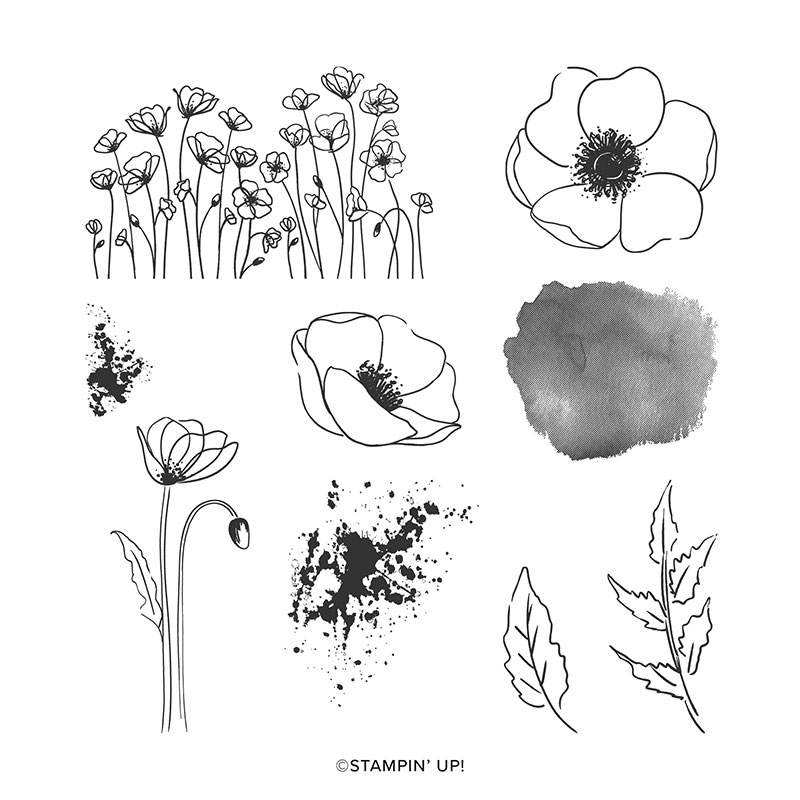
This is actually a mega-suite, meaning it has two stamp sets and two die sets, plus lots of other awesome coordinating accessories. One of the items from this suite is a hidden gem that I'm showcasing in this month's tutorial, so check it out below!
Be happy, create and stamp a little ....

PEACEFUL POPPIES ELEMENTS TUTORIAL
These aren't your run-of-the-mill die-cuts either. You get a whole selection of die cut images, shapes, and labels with embossing, foil accents, coloured images, and printed vellum that make it quick and simple to step-up the style on your projects.
Plus, if you are wanting to up the artistry, these elements are great for techniques like colouring, embossing, emboss resist, and more.
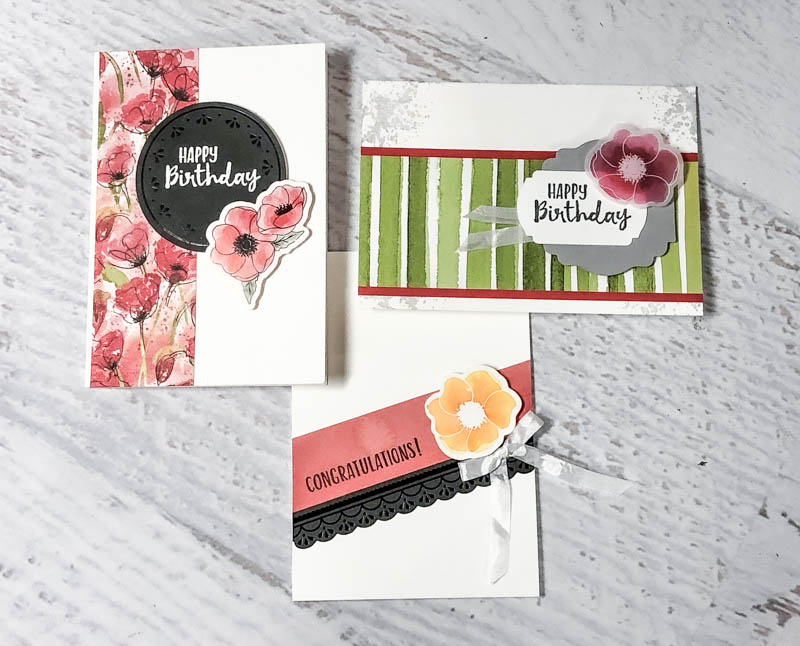
This tutorial shares how to create 3 note cards that showcase 5 fantastic ways to use the Peaceful Poppies Elements!
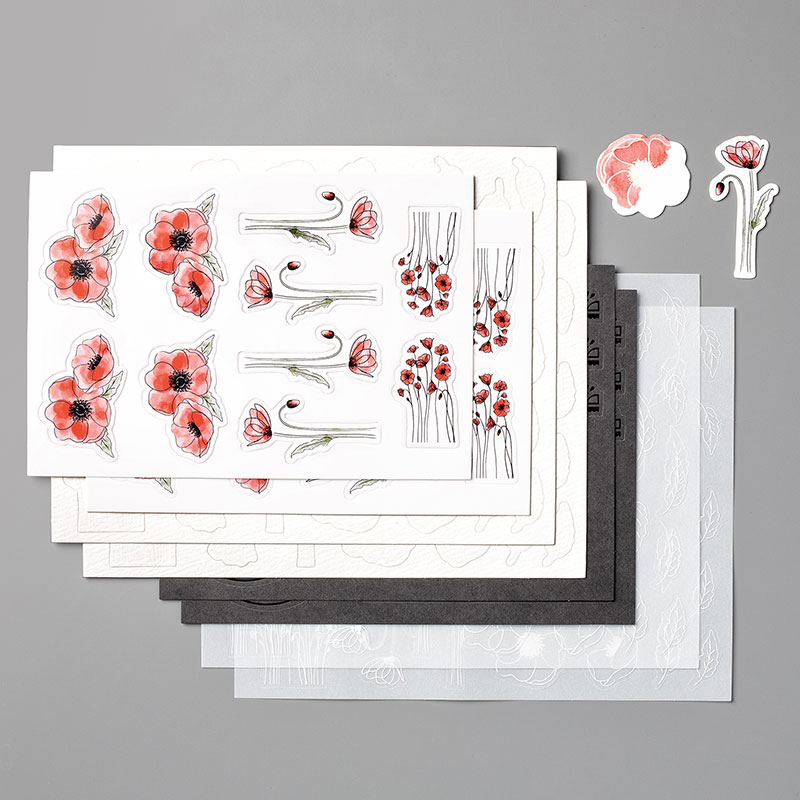
Peaceful Poppies Elements: 8 sheets total
* 2 sheets black die-cut elements with black foil prints: labels, banners, borders
* 2 sheets white thick cardstock die cuts with coloured prints: poppies
* 2 sheets vellum die cuts with white prints: poppies and leaves
* 2 sheets watercolour paper die cuts with clear UV prints for water colouring: poppies and leaves
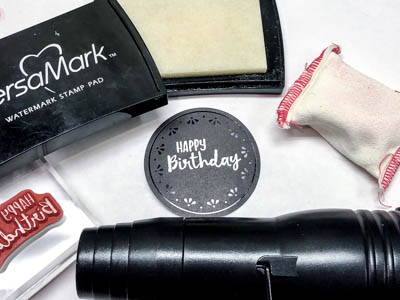
1. Heat Emboss
Pop out a black foiled cardstock circle from the Peaceful Poppies Elements kit. Rub with the Embossing Buddy. Stamp greeting from the Sale-A-Bration Sending You Thoughts stamp set with VersaMark ink. Cover with White Stampin' Emboss Powder. Tap off excess and heat emboss using the Heat Tool.
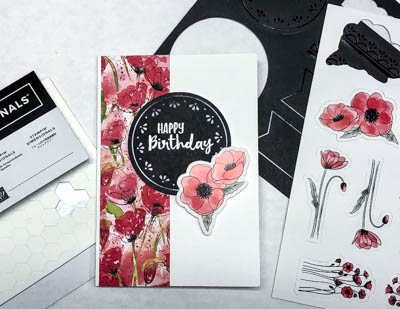 2. Embellish Note Card 1
2. Embellish Note Card 1Start with a pre-cut and pre-scored Whisper White Note Card. Cut a 1-1/2" x 5" strip of Peaceful Poppies Designer Series Paper. Adhere 1/8" from left edge of card. Adhere embossed black circle to card front with Stampin' Dimensionals. Pop out a pre-coloured poppies from an elements sheet and adhere as a coordinating accent using Stampin' Dimensionals.
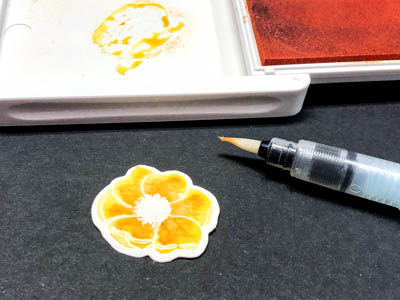
3. Watercolour a Poppy
Pop out a watercolour paper poppy from the elements sheet. Brush water inside the embossed outline. Use Pumpkin Pie and Mango Melody inks and an Aqua Painter to watercolour the flower. Allow to dry.
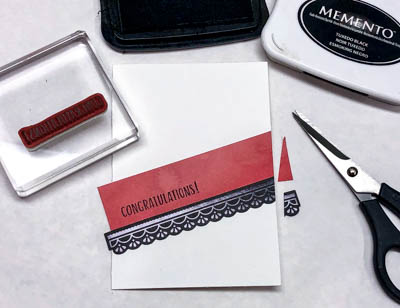
4. Stamp & Diagonal Accents
Cut a 1" x 4" piece of Peaceful Poppies Designer Series Paper. Stamp greeting with Tuxedo Black Memento ink. Adhere strip at a diagonal across a pre-cut note card. Pop out a black foiled scallop strip. Adhere alongside paper strip. Trim off excess at edges of card with Paper Snips.

5. Embellish Note Card 2
Adhere water-coloured poppy to top right of diagonal strip with Stampin' Dimensionals. Tie a bow with Whisper White 1/4" Crinkled Seam Binding Ribbon. Adhere below poppy with a Glue Dot.

6. Colour Vellum Poppy
Pop out a vellum poppy from the elements sheet. Flip it over so the white embossing is face down. Colour the poppy with Light and Dark Poppy Parade Stampin' Blends. Colour the centre with the dark and blend out to the edge with the light.
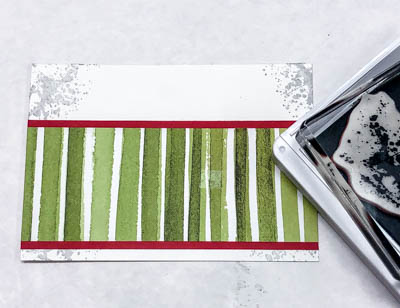
7. Stamp & Layer
Ink the splatter stamp with Smoky Slate ink. Stamp off once and stamp onto the corner of a pre-cut note card. Repeat for all four corners. Layer 2" x 5" stripped Peaceful Poppies Designer Series Paper onto 2-1/4" x 5" Poppy Parade cardstock. Adhere to card front.
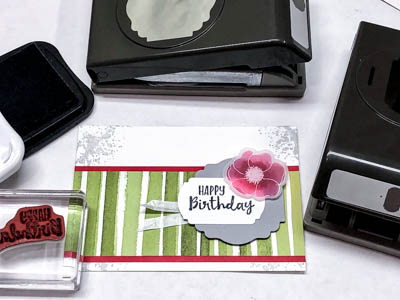
8. Embellish Note Card 3
Stamp greeting on Whisper White cardstock with Tuxedo Black Memento ink. Punch out with Label Me Fancy Punch. Punch scrap Smoky Slate with Label Me Lovely Punch. Layer punched greeting off centre to the left of the larger punch. Add a "V" of Whisper White 1/4" Crinkled Seam Binding Ribbon behind labels. Add label to card with Stampin' Dimensionals. Add the coloured vellum poppy with a single Stampin' Dimensional hidden behind the embossing in the centreSUPPLIES

Current Host Code
CLICK TO SHOP WITH HC


Free Newsletter!

Paper Pumpkin
SIGN ME UP!

Share With Friends
Most Recent Blog Posts
- FREE SHIPPING - DEC 14
- FREE SHIPPING from Oct 9th to 11th
- Stamp another Stack of Christmas Cards with Kevin & Christine
- Let the fun begin - again …
- Why wait? Join us now!
- Fitting Florets for any Occasion
- Festive Window Wishes
- Starter Kit + = No brainer!
- Perched in a Tree
- Awash in Beauty, so gorgeous!

.jpg)
.jpg)
.jpg)
.jpg)
.jpg)
.jpg)
.jpg)
.jpg)
.jpg)
.jpg)
.jpg)
.jpg)
.jpg)
.jpg)
.jpg)
.jpg)
.jpg)
.jpg)
.jpg)
.jpg)
.jpg)
.jpg)
.jpg)
.jpg)
.jpg)
.jpg)
.jpg)
.jpg)
.jpg)
.jpg)
.jpg)
.jpg)
.jpg)
.jpg)
.jpg)
.jpg)
.jpg)
.jpg)
.jpg)
.jpg)
.jpg)
.jpg)
.jpg)
.jpg)
.jpg)
.jpg)
.jpg)
.jpg)
.jpg)
.jpg)
.jpg)
.jpg)
.jpg)
.jpg)
.jpg)
.jpg)
.jpg)
.jpg)
.jpg)
.jpg)
.jpg)
.jpg)
.jpg)
.jpg)
.jpg)
.jpg)
.jpg)
.jpg)
.jpg)
.jpg)
.jpg)
.jpg)
.jpg)
.jpg)
.jpg)
.jpg)
.jpg)
.jpg)
.jpg)
.jpg)
.jpg)
.jpg)
.jpg)
.jpg)
.jpg)
.jpg)
.jpg)
.jpg)
.jpg)
.jpg)
.jpg)
.jpg)
.jpg)
.jpg)
.jpg)
.jpg)
.jpg)
.jpg)
.jpg)
.jpg)
.jpg)
.jpg)
.jpg)
.jpg)
.jpg)
.jpg)
.jpg)
.jpg)
.jpg)
.jpg)
.jpg)
.jpg)
.jpg)
.jpg)
.jpg)
.jpg)
.jpg)
.jpg)
.jpg)
.jpg)
.jpg)
.jpg)
.jpg)
.jpg)
.jpg)
.jpg)
.jpg)
.jpg)
.jpg)
.jpg)
.jpg)
.jpg)
.jpg)
.jpg)
.jpg)
.jpg)
.jpg)
.jpg)
.jpg)
.jpg)
.jpg)
.jpg)
.jpg)
.jpg)
.jpg)
.jpg)
.jpg)
.jpg)
.jpg)
.jpg)
.jpg)
.jpg)
.jpg)
.jpg)
.jpg)
.jpg)
.jpg)
.jpg)
.jpg)
.jpg)
.jpg)
.jpg)
.jpg)
.jpg)
.jpg)
.jpg)
.jpg)
.jpg)
.jpg)
.jpg)
.jpg)
.jpg)
.jpg)
.jpg)
.jpg)
.jpg)
.jpg)
.jpg)
.jpg)
.jpg)
.jpg)
.jpg)
.jpg)
.jpg)
.jpg)
.jpg)
.jpg)
.jpg)
.jpg)
.jpg)
.jpg)
.jpg)
.jpg)
.jpg)
.jpg)
.jpg)
.jpg)
.jpg)
.jpg)
.jpg)
.jpg)
.jpg)
.jpg)
.jpg)
.jpg)
.jpg)
.jpg)